A game's page
On this page
Pressing A on a game in the grid opens its page: artwork, description, and everything you can do with that one game.
A game’s page
Pressing A on a game opens its page: artwork, description, and what you can do with it.
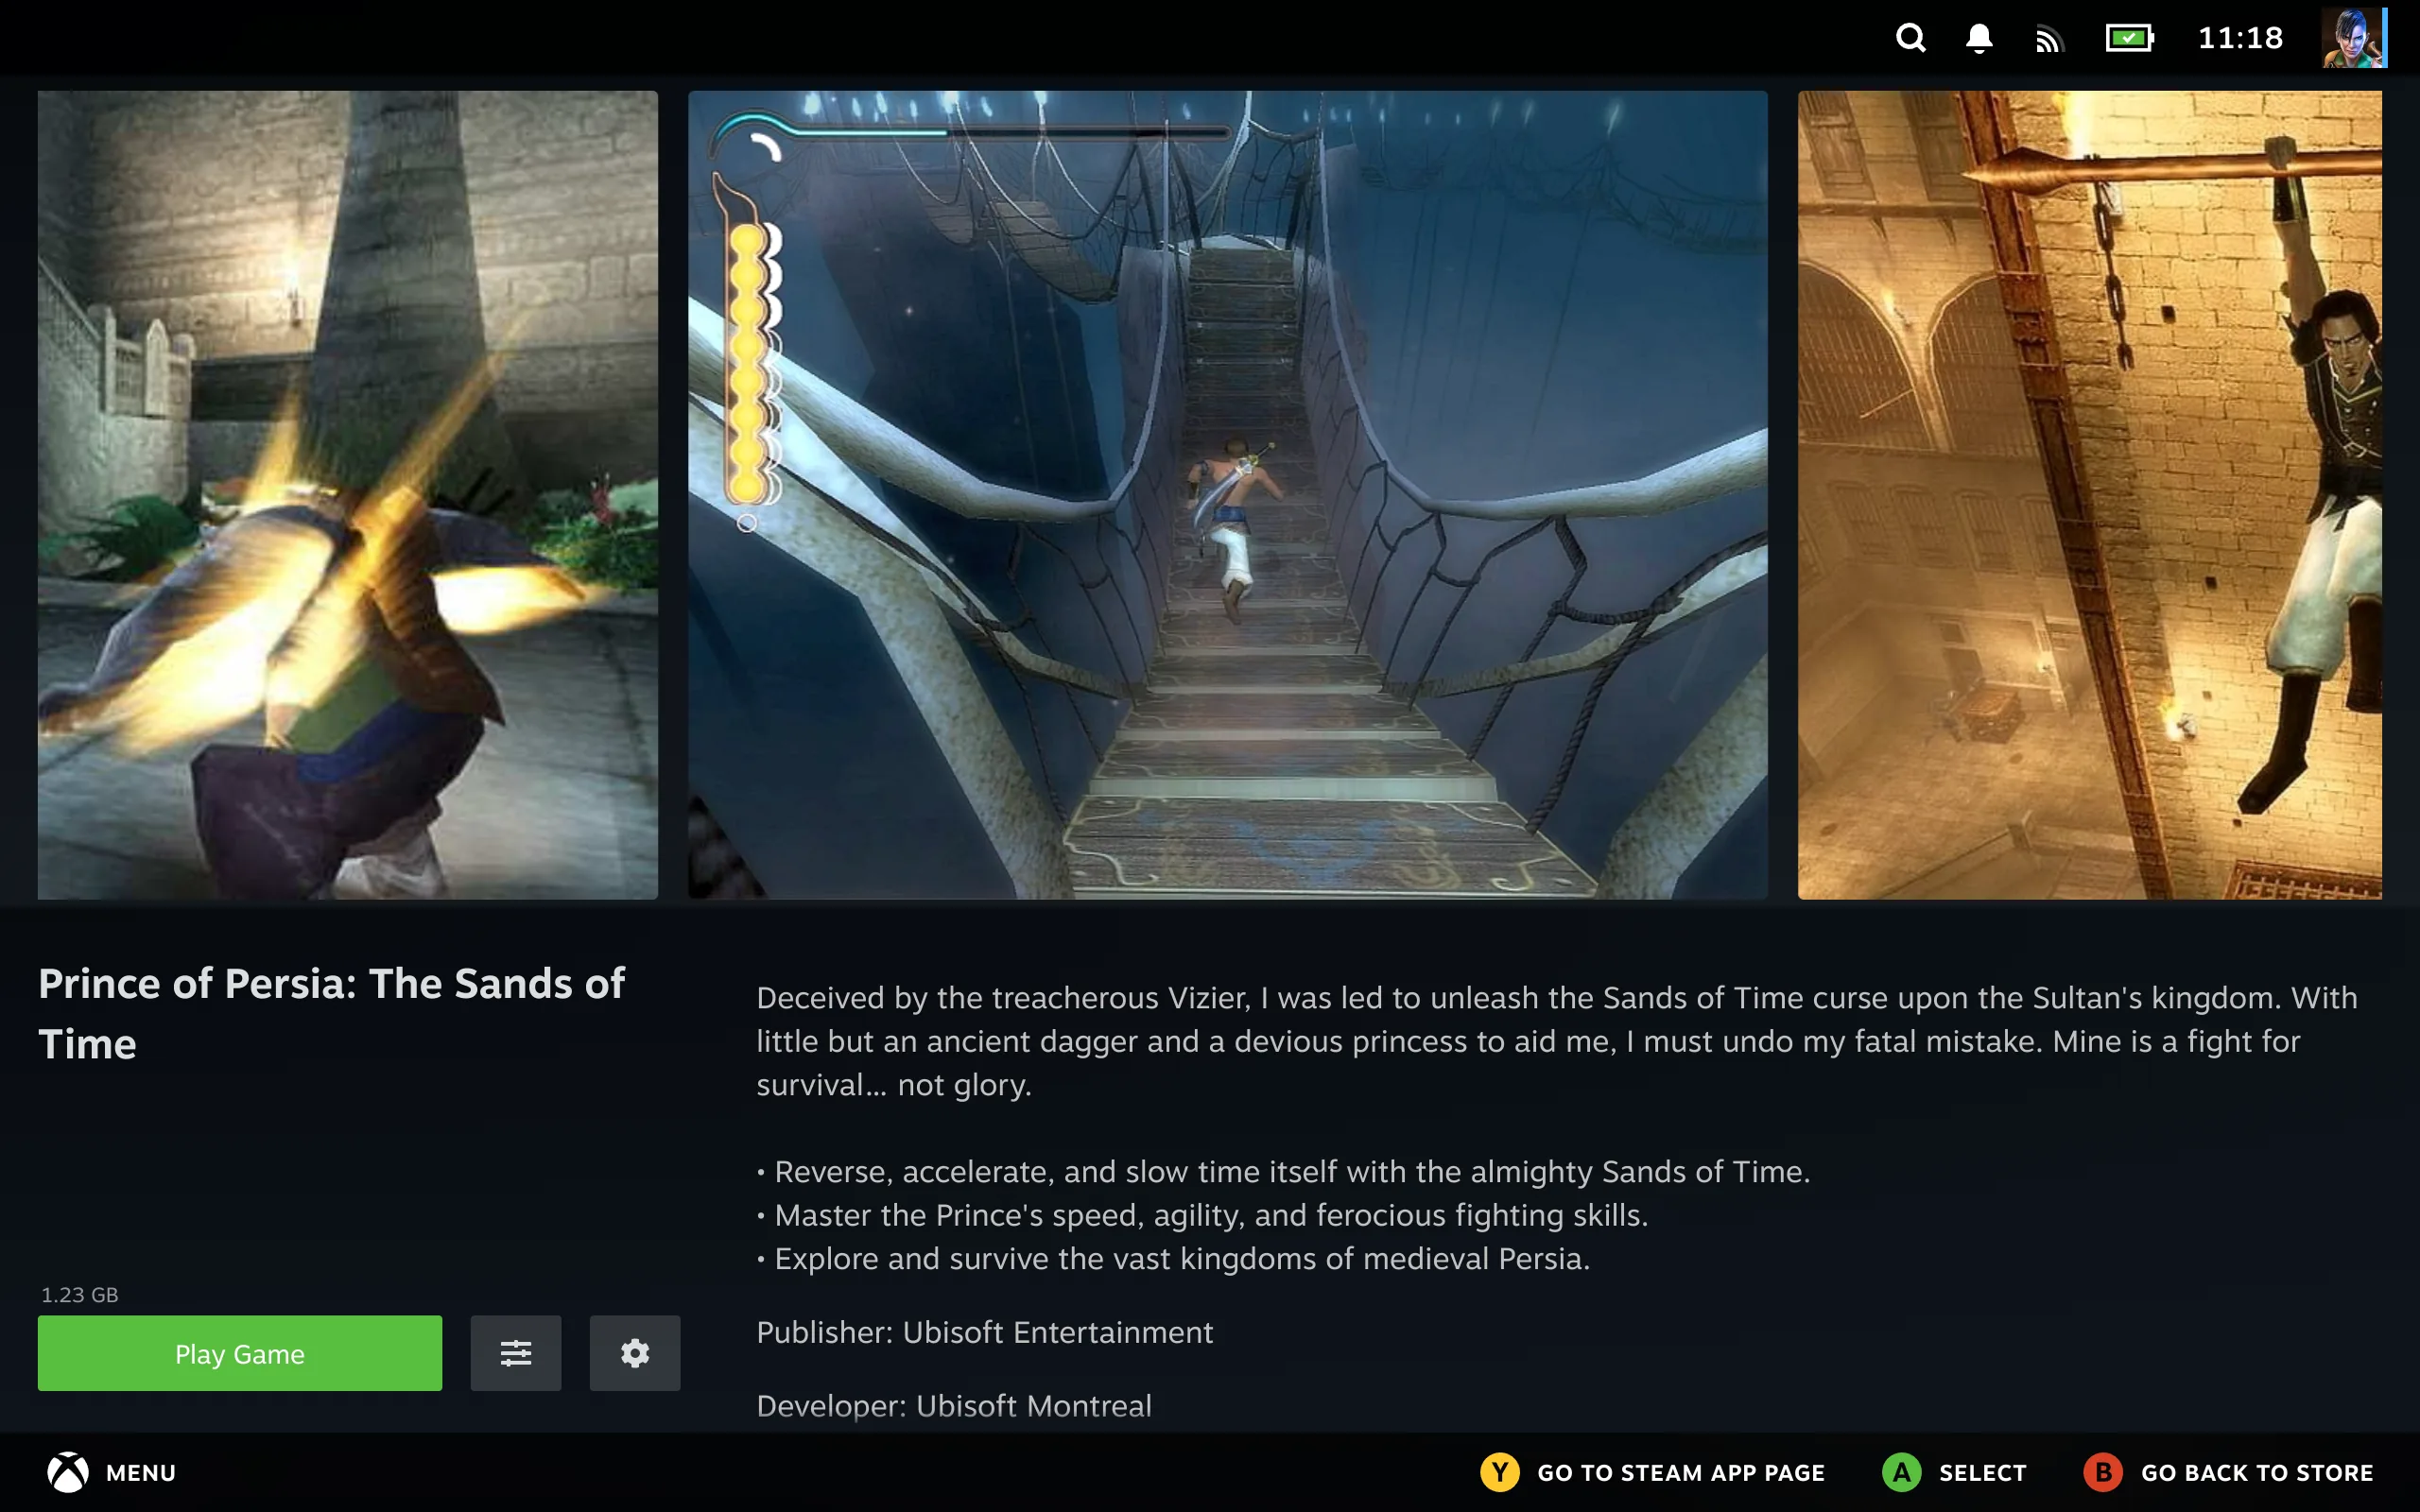
If it isn’t installed, the main action installs it. Some stores also offer Import for a copy you already have.
If it is installed, you get a launch button and a menu of everything else you can do with it.
The number above the button is a size, and which size depends on the button. With Install Game it’s how big the download will be. Once the game is installed and the button reads Play Game, it’s how much space the game is taking on disk.
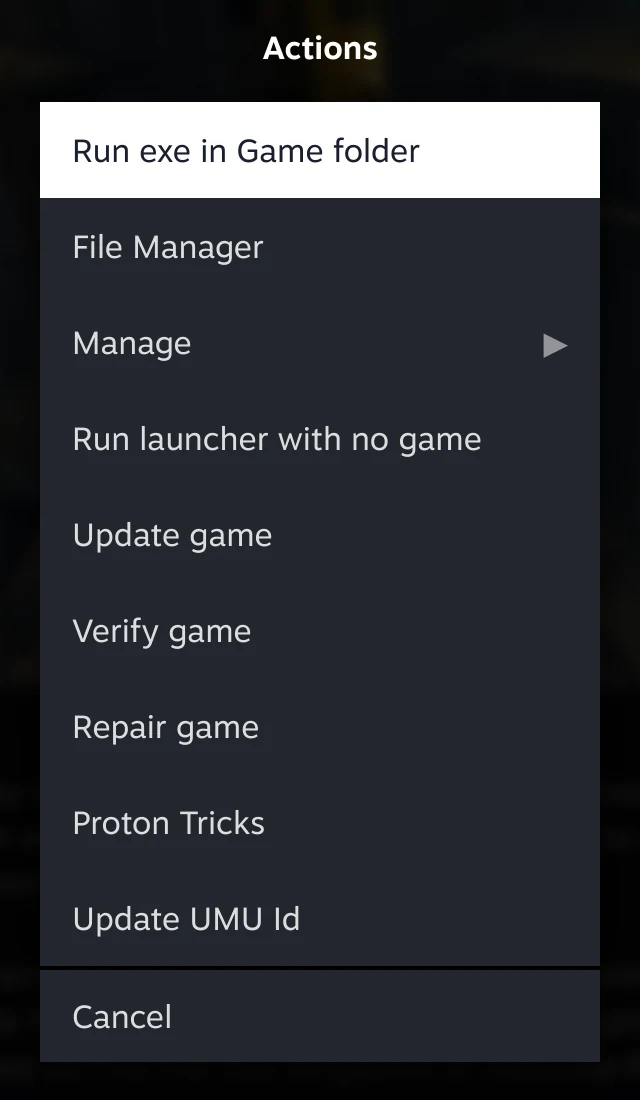
In the order they appear on screen:
| Entry | Does |
|---|---|
| Run Exe | Runs another executable from the game’s folder, and can change what the shortcut launches |
| File Manager | Opens the File Manager pointed at that game |
| Manage | A submenu, below |
| Run launcher with no game | Starts the launcher without passing it a game. Meant for custom emulator extensions, where the emulator needs setting up outside of any one game |
| Update game | Fetches a newer version, where the store offers one |
| Verify game | Checks the files on disk against what should be there and fetches anything missing |
| Repair game | The same idea, for a game that’s damaged rather than incomplete |
| Proton Tricks | Opens Protontricks for this game, if you have it installed |
| Update UMU Id | Fetches the game’s UMU ID again, for a game that didn’t have one when you installed it |
What’s on this menu comes from the extension, so it varies by store and by what the game supports. Entries that only make sense for an installed game aren’t shown until it is.
Update UMU Id is worth knowing about for older installs. The UMU ID is what applies the right compatibility fixes when a game launches. Not every game had one when it was added, so something you installed a while ago may be running without. This fetches it.
Run launcher with no game is for emulator extensions. It exists so a custom extension can open its emulator with nothing loaded, for configuration that has to be done ahead of time or outside a particular game. ScummVM is the obvious case: open it, set it up in its own interface, and come back.
Nothing is passed to the launcher, no executable and no arguments, so what you get depends entirely on what that launcher does when started empty.
Beside it is a cog, which opens that game’s own settings: its details, its artwork, and what runs it.
The same pair as on the grid, doing the same jobs. Sliders for things that happen, cog for things that stay. See Two buttons worth recognising. The cog is absent for a game with nothing to configure.
Inside Manage:
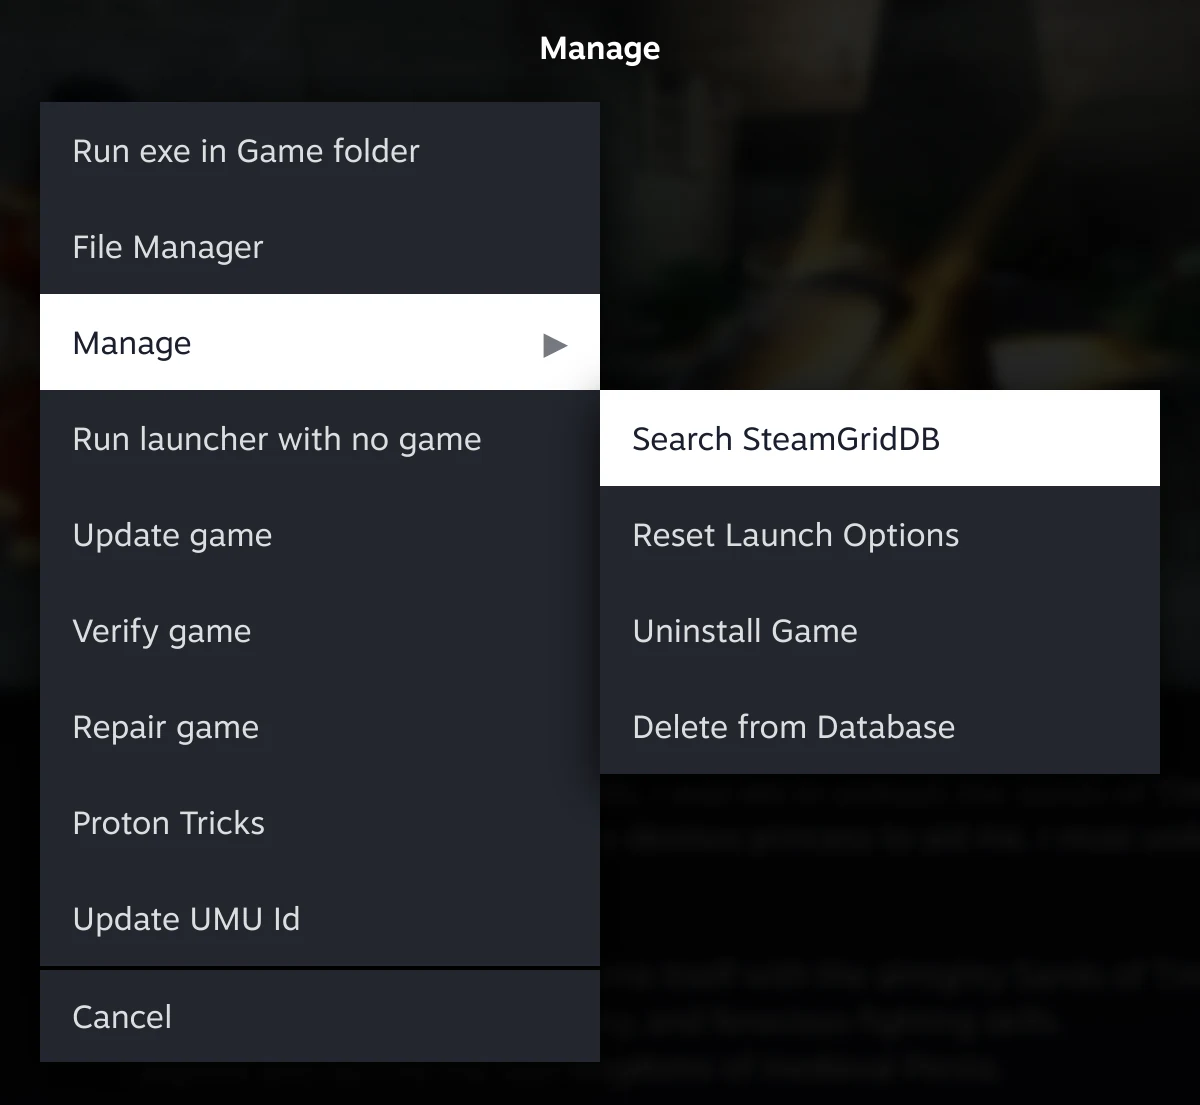
| Entry | Does |
|---|---|
| Search SteamGridDB | Fetches different artwork, if you’ve set up a key |
| Reset Launch Options | Rebuilds the Steam shortcut: launch settings and artwork, from the game’s recorded details, not from how it originally shipped |
| Uninstall Game | Removes it, after confirming. Read the warning: it deletes the game’s files and its Proton prefix, including any saves kept in the game’s folder |
| Delete from Database | Removes Junk Store Pro’s record of the game. It comes back on the next refresh |
Delete from Database is the single-game version of Delete Unlinked Games. It drops what Junk Store Pro has recorded about that one game, and a refresh fetches it again. Useful for a game whose details have gone wrong and won’t correct themselves. It’s a different thing from Delete from Database on the download queue, which only clears a queue entry.
Verify and Repair are the ones to remember. They’re how you fix a game that’s misbehaving after a bad download, and how you apply a DLC or language change once a game is already installed.
Y opens the game’s Steam page when it has one, where the hint reads Go to Steam App Page.
That’s where Steam’s own settings for the game live, including which compatibility tool it runs under. Changing a Windows game’s Proton version is done there, through Steam’s properties, rather than anywhere in Junk Store Pro. The Junk Store website covers how.
Run Exe
Worth knowing about. Old games often ship a separate configuration tool, and DOS and Windows games sometimes need one run before the game will work properly. This is how you reach those without leaving Game Mode.
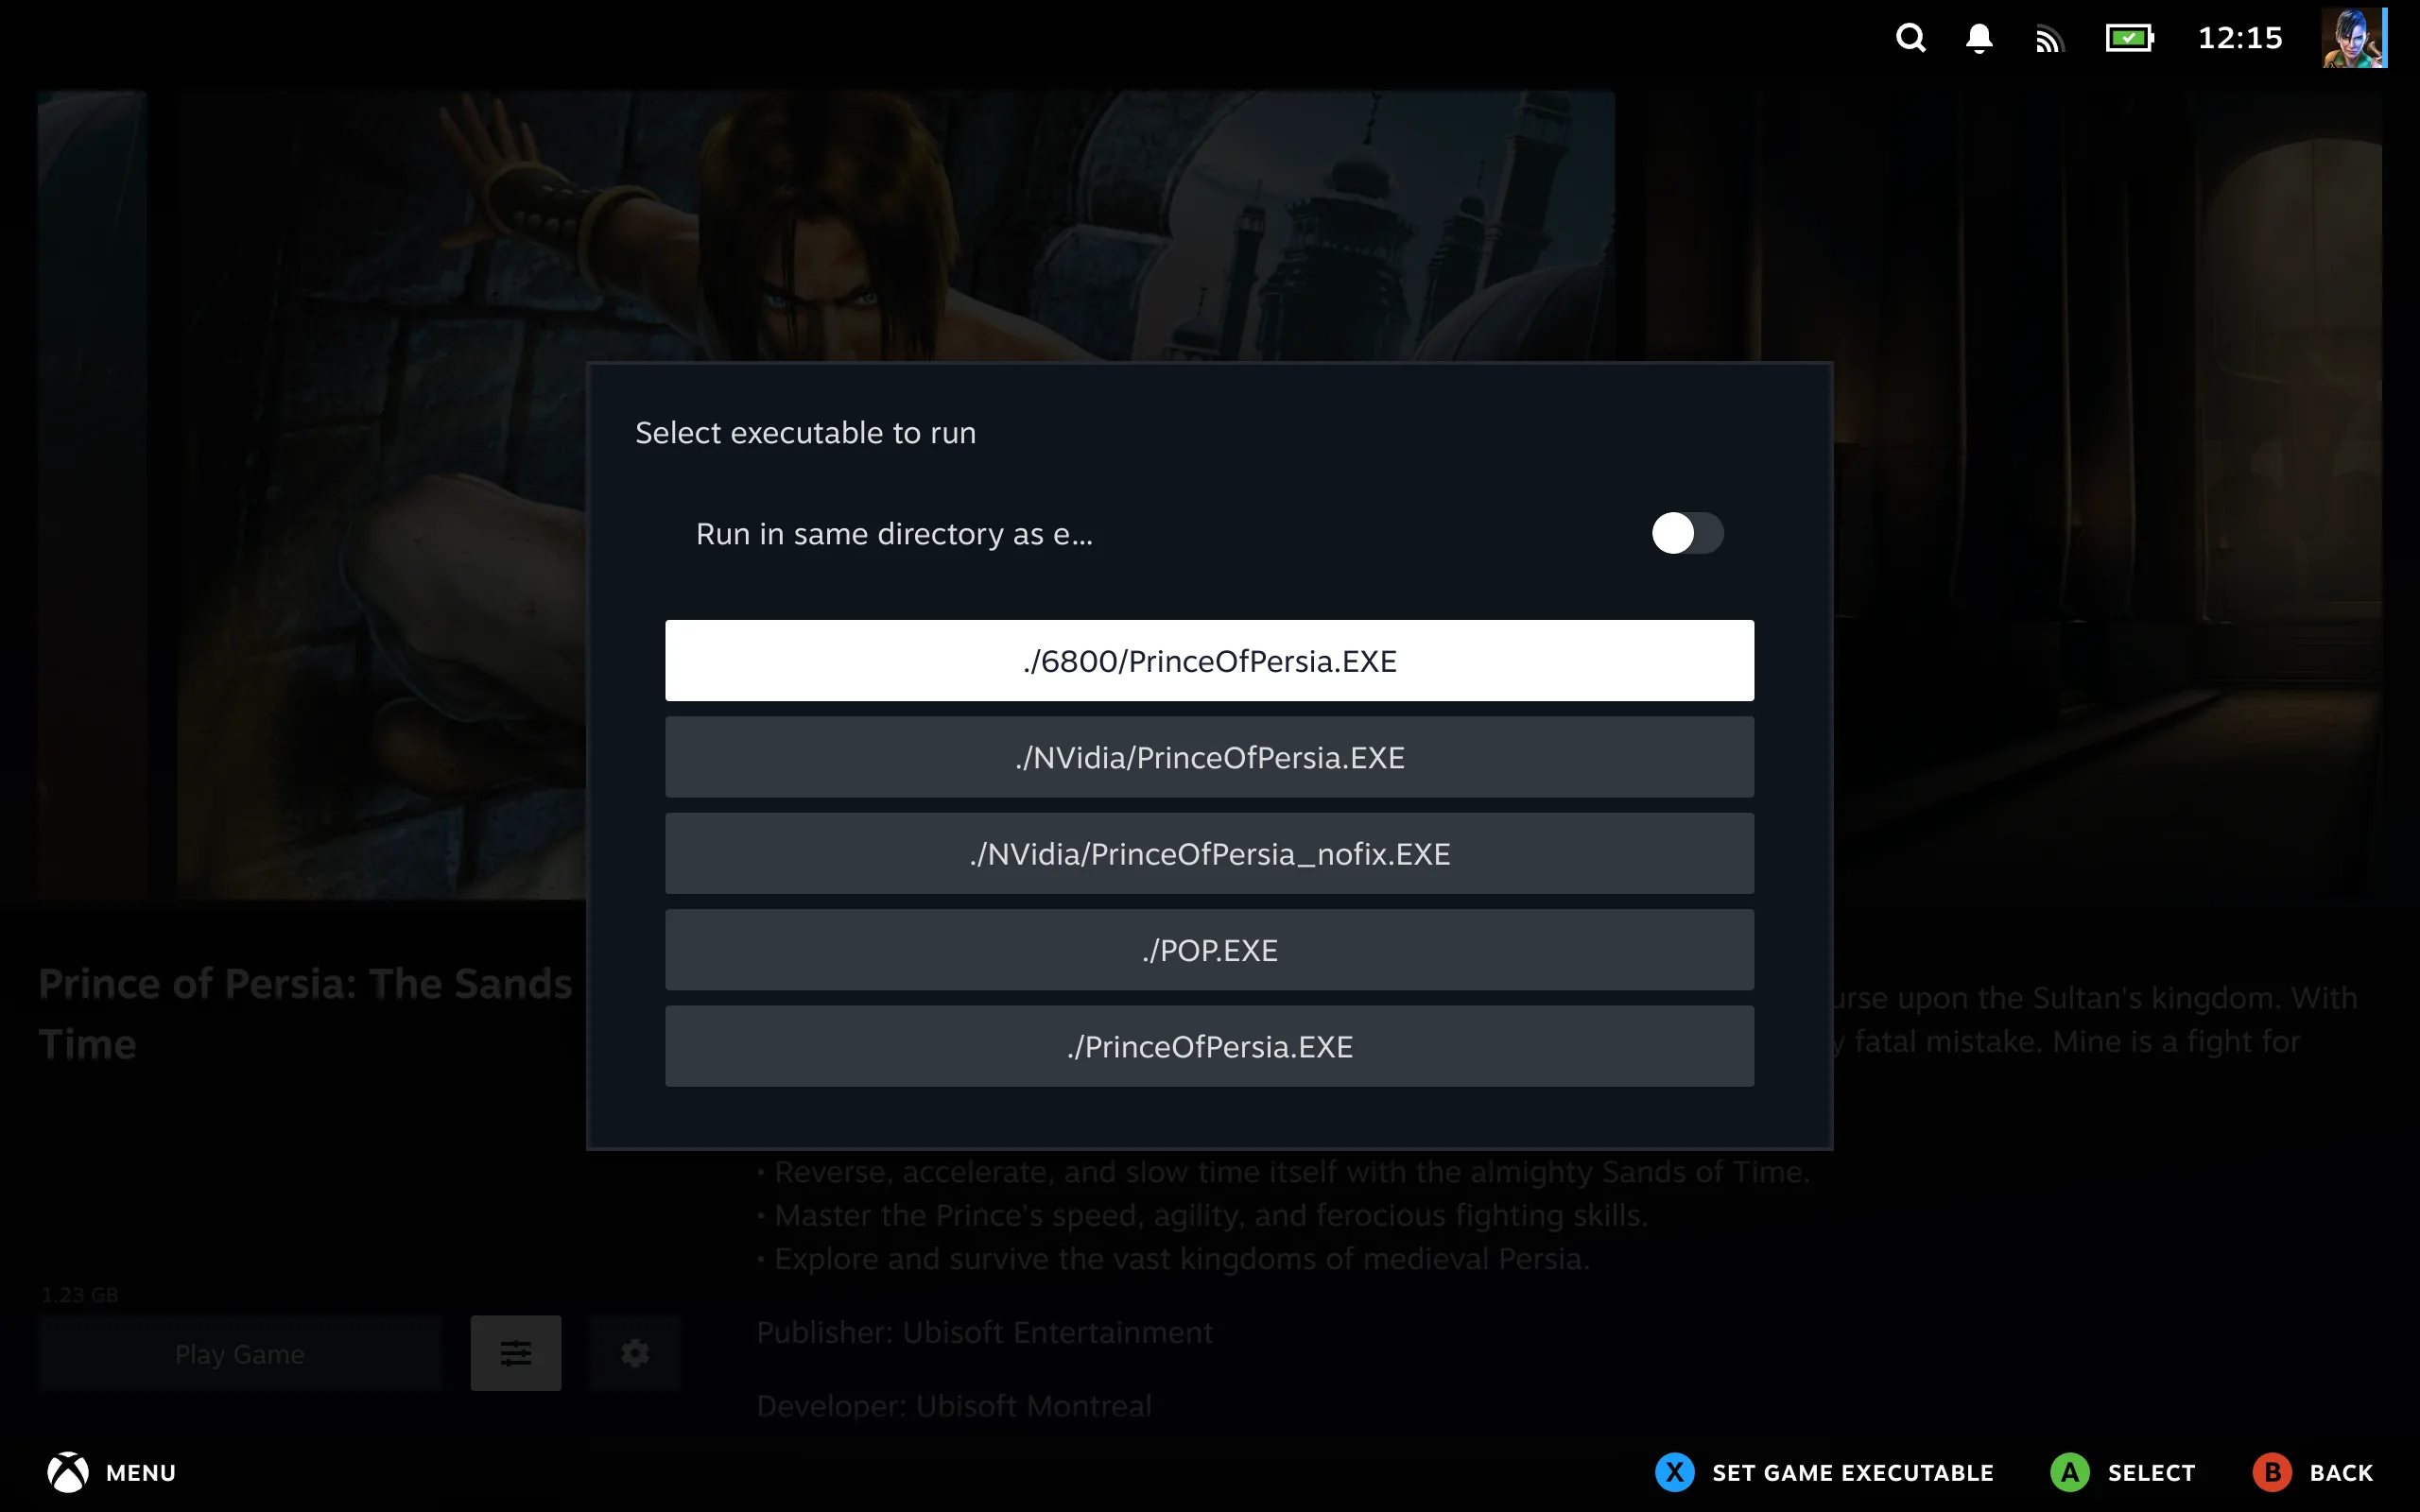
It opens a list headed Select executable to run, showing the programs found in the game’s folder. Press A on one to run it.
Run in same directory as executable is a toggle above the list. Some programs only work when started from their own folder, because they expect to find their data files beside them. If something runs but immediately complains about missing files, turn this on and try again. It’s off to begin with.
Set the toggle before you press anything, because it applies to whichever button you press next. On its own it lasts for that one run and nothing is remembered. Its real use is alongside X, below, where it’s written into the shortcut and sticks.
Installing a dependency that isn’t in the Dependencies list
A game’s Installation settings have a Dependencies section listing the supporting components that store knows about. Sometimes an older Windows game wants a runtime or library that isn’t on it.
Run Exe is how you install one anyway, because whatever you run here runs inside that game’s own Windows environment.
Copy the installer into the game’s folder and it appears among the executables. Run it from there, and what it installs lands in that game’s environment where the game can find it.
The File Manager is how you get the file there, whether it’s coming from an SD card, a USB drive, or another machine.
It only affects that one game. Each game has its own environment, so installing something for one doesn’t install it for another, and a broken attempt can’t spread. If you make a mess of it, uninstalling and reinstalling the game gives you a clean one.
Get the installer from somewhere you trust. It runs with the same reach the game has.
Changing what the game launches
Press X on an entry instead, and that program becomes what the shortcut launches. The hint says Set game executable. From then on, pressing Play starts that rather than whatever was set before.
Turn the toggle on first if the program needs its own folder, because X is what makes that stick. With the toggle on, pressing X sets the shortcut’s working folder to the program’s folder at the same time as setting the executable. With it off, only the executable is set and the working folder is left as it was.
That’s the pairing to remember: toggle, then X. A game that needed the toggle to run properly under Run Exe needs it on when you set the executable too, or it’ll launch from the wrong folder and fail the same way it did before. Doing it in the other order, or pressing X with the toggle off, is the usual reason a game runs fine from Run Exe but not from Play.
This is the fix for a game whose shortcut points at the wrong thing, a launcher rather than the game, or an installer left behind. It’s also how you switch deliberately to a different build or a modded executable in the same folder.
It changes the shortcut, not the files. Nothing is moved or deleted, and pointing it at something else afterwards is the same two presses.
It also doesn’t survive a reset. Reset Launch Options rebuilds the shortcut from the game’s recorded details, so it will undo what you set here. That’s the way back if you lose track of what the executable should be, and the thing to watch for if you reset a game for some unrelated reason. To make a change permanent, set it in Game Details instead.
The File Manager does the same job
Both of these are also in the File Manager, if you’d rather work that way: Set as Game Executable on a file and Set as Working Directory on a folder, both in the Steam submenu.
The difference is what you’re choosing from. Run Exe gives you a shortlist of the programs Junk Store Pro found, which is quicker when the one you want is on it. The File Manager lets you browse the whole folder, which is what you need when it isn’t, or when the executable is somewhere unexpected, or when you want to set the working folder to a directory that isn’t the executable’s own.
The same submenu also sets artwork, so it’s worth knowing about for more than this.
Proton Tricks
Proton Tricks is on the same menu as Run Exe, for installed games. It opens Protontricks, a separate tool for poking at the Windows environment a game runs in: installing runtimes, flipping compatibility settings, and the other things people are told to try when a Windows game misbehaves on Linux.
It needs Protontricks installed as a flatpak, and Junk Store Pro doesn’t install it for you. If you haven’t got it, choosing the entry does nothing much, which is the usual reason for “I pressed it and nothing happened”. Install the flatpak first and it starts working.
Be prepared for it to be hit and miss. It’s a desktop program being run inside Game Mode, and it shows: the window can misbehave, controls can be awkward to reach, and sometimes it just doesn’t come up properly. That isn’t Junk Store Pro going wrong, it’s the seam between two things that were never designed to meet. When it works it’s genuinely useful, and when it doesn’t, Desktop Mode is the reliable way to run the same tool.
Try Run Exe first if all you want is to run an installer inside the game’s environment. It’s the simpler path and it stays in Game Mode. Protontricks is for the cases that need more than that.
It writes a log while it runs, so there’s something to look at or attach to a support ticket if it misbehaves.
Search SteamGridDB
Search SteamGridDB, in the Manage menu, replaces a game’s artwork with something from SteamGridDB, a community library of game artwork. It’s the answer for a game whose picture is missing, wrong, or just ugly.
It needs a SteamGridDB key set up in Settings first.
Finding your game
It searches for the game by name as soon as it opens and picks the first match, so most of the time the artwork is on screen without your doing anything.
If it picked the wrong game, a dropdown at the top lists the other matches. Choose the right one and the artwork reloads. The dropdown only appears when the search found more than one.
If it found nothing, you’re asked for a different search term, and you can try again as often as you like. This is worth persisting with, because the name Junk Store Pro knows a game by isn’t always the name SteamGridDB files it under. Subtitles, edition names, punctuation and years are the usual culprits, so a shorter search often works better than a longer one.
Press the menu button at any time to change the search term, not just when nothing was found. Useful when the search picked something plausible but wrong.
The four kinds of artwork
Artwork is grouped into tabs, matching the places Steam shows a picture:
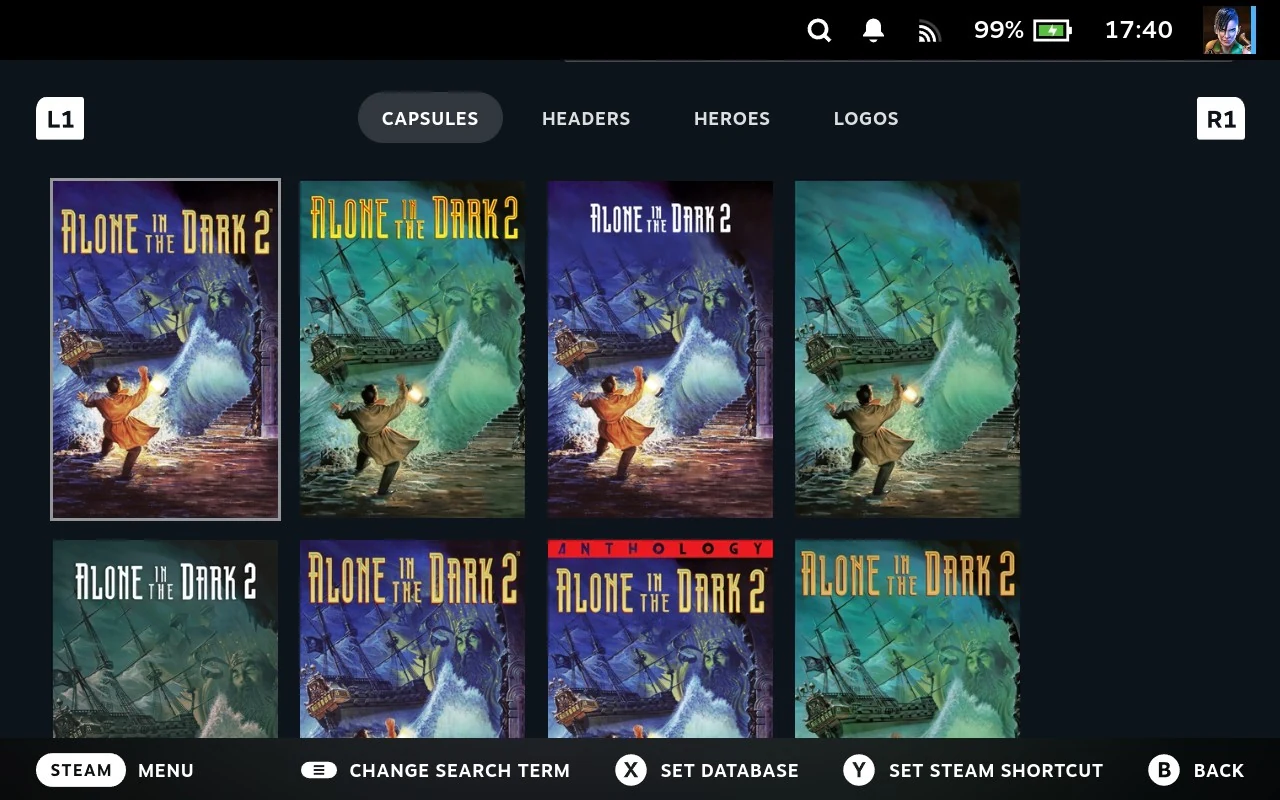
| Tab | Where it shows |
|---|---|
| Capsules | The tall cover in your library grid |
| Headers | The wide banner across the top of the game’s page |
| Heroes | The large background image behind the page |
| Logos | The game’s title graphic, laid over the background |
Each tab holds what SteamGridDB has of that kind, and a tab can be empty while others have plenty. Setting one doesn’t affect the others, so you can mix and match, and you don’t have to fill in all four.
Choosing where it goes
Picking a picture asks you a question rather than applying it straight away: How would you like to set this artwork? You get a preview and three answers.
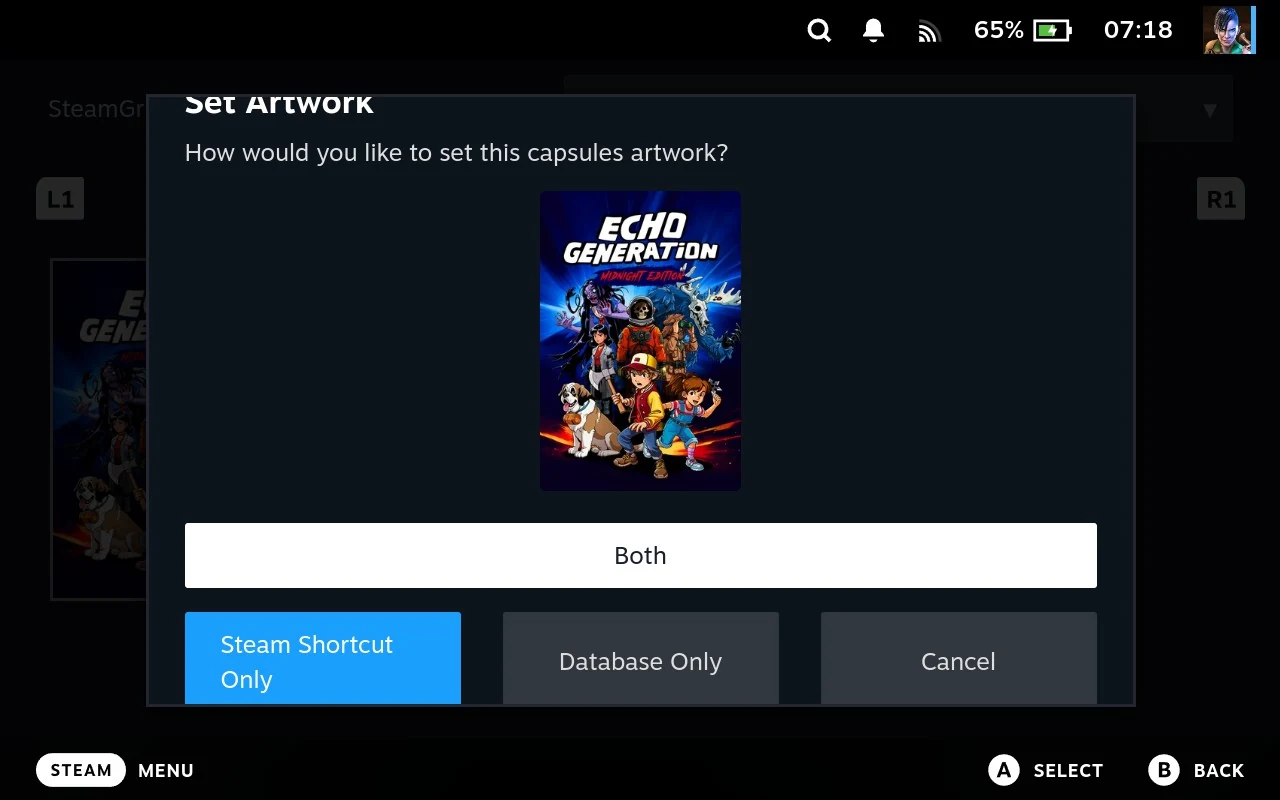
| Choice | Does |
|---|---|
| Steam Shortcut Only | Sets it on the Steam shortcut, so it shows in your Steam library |
| Database Only | Sets it in Junk Store Pro, so it shows on the game’s page here |
| Both | Does both, which is what most people want |
That distinction is the part worth understanding. Junk Store Pro and Steam keep their own artwork, and they don’t share. A picture set in one place won’t appear in the other, so choosing one of the first two options and then wondering why the picture didn’t change is usually a matter of having set it in the other place.
Both is the sensible default unless you have a reason to want them different.
There’s a real difference behind the scenes. Steam Shortcut Only downloads the picture and hands the file to Steam, so it stays put. Database Only stores a link to it, which is fetched when needed and kept in the image cache.
One thing does cross between them. Reset Launch Options copies Junk Store Pro’s artwork onto the Steam shortcut. So a Database Only picture reaches Steam if you later reset, and a Steam Shortcut Only picture is replaced when you do. Choosing Both avoids having to think about it.
Installing
Installing puts the game on your Deck and adds it to your Steam library, so it launches from there like anything else afterwards.
Progress shows on the game’s page, and the download queue tracks it alongside anything else running. You can leave the page while it works.
You aren’t asked anything. Installing starts straight away, which is what most people want most of the time.
On Epic and GOG that means choices are made for you. The language is English and every DLC you own is included, because those are the defaults. A game with a lot of DLC can therefore be a good deal bigger than you need, and a game you’d rather have in another language will arrive in English.
Check first if that matters to you. The choices live under Installation on the game’s own cog, and you can look at them and change them before you press Install. See Per-game installation settings for what’s in there and how the two stores differ.
If you’d rather be asked every time, turn on Show installation options in that store’s settings. Then pressing Install brings the panel up first instead of starting the download.
When it does come up, X starts the install. The panel is the ordinary settings screen, so X saves it, and saving is what sets the download going. Backing out without saving cancels the install rather than starting it with what was there before, which catches people out the first time.
You aren’t stuck with what you chose. The same settings can be changed later, though applying a change then needs a Verify game or Repair game to move the files.
Other stores mostly have nothing to ask and start straight away regardless.
Importing a copy you already have
If the game’s files are already somewhere you can reach, you can point Junk Store Pro at them instead of downloading it again. Useful for a game you copied off before a reinstall, one sitting on an external drive, or one that’s already on another Deck in the house.
Press X on the Install Game button. The hint reads Import. It’s on the same button as installing, which is easy to miss, and it only appears when the store supports importing and the game isn’t installed yet.
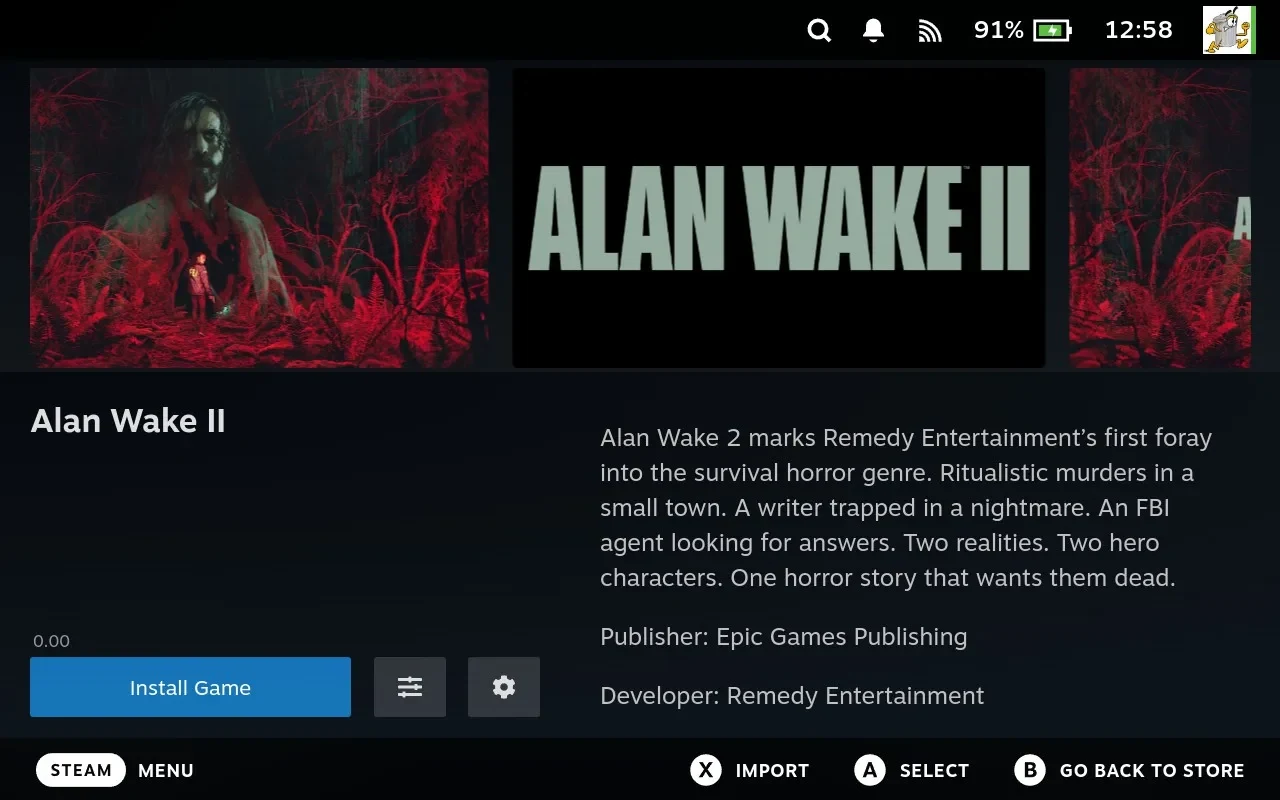
That opens a window titled Import game name, with two ways to find the files.
Browsing for the folder
Browse for game directory… opens a folder picker. Point it at the folder containing the game and Junk Store Pro takes it from there.
Anywhere the File Manager can reach works, so an SD card or a USB drive is fine, and so is another machine over SSH. Browse to it through the sidebar the same way you would in the File Manager, pick the game’s folder there, and the files come across the network.
That’s the manual version of the search below, and it’s what to use when the automatic search doesn’t find what you’re after: a machine that isn’t running Junk Store Pro, one that isn’t answering queries, or a copy sitting in a folder rather than properly installed.
Taking it from another Deck
This is the part worth knowing about. The window searches your network by itself, and you’ll see Searching network… while it does.
Junk Store Pro asks every machine on the local network whether it has this particular game installed, and any that do are listed as Available on network, each showing its name and address. Pick one and the files are copied across.
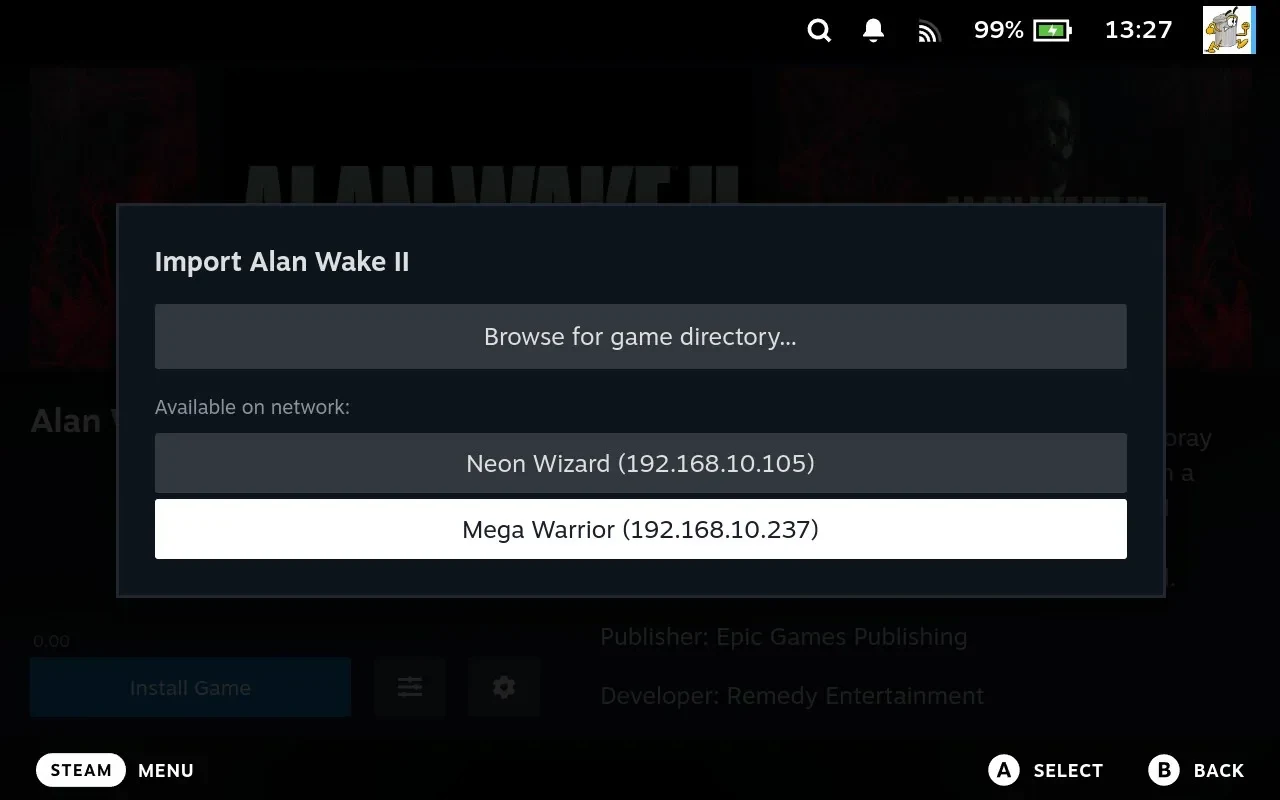
The search takes about three seconds. If nothing turns up you’ll see No machines on the network have this game installed, which is a statement about that one game, not about your network. You can still browse to a machine by hand with the button above, which doesn’t depend on any of the conditions below.
Nothing is shared without permission. For another Deck to appear in that list:
- It has to be on and awake, with Junk Store Pro running. A sleeping Deck can’t answer.
- It has to have the game properly installed, meaning added to its Steam library. A half-finished download or a folder of files it doesn’t know about won’t count.
- It has to be willing to answer. Answering these questions is controlled by Respond to Game Queries on that machine. It’s on by default; turn it off and the Deck stays silent.
- You need an SSH key between the two machines, since that’s how the files travel. Without one you’ll get SSH Failed and a note that key exchange is needed. Set the key up and try again.
Only machines that actually have the game reply at all, so an empty list means exactly what it says.
Once it starts
The import is queued like any other download and shows up in the queue alongside them. You can leave the page.
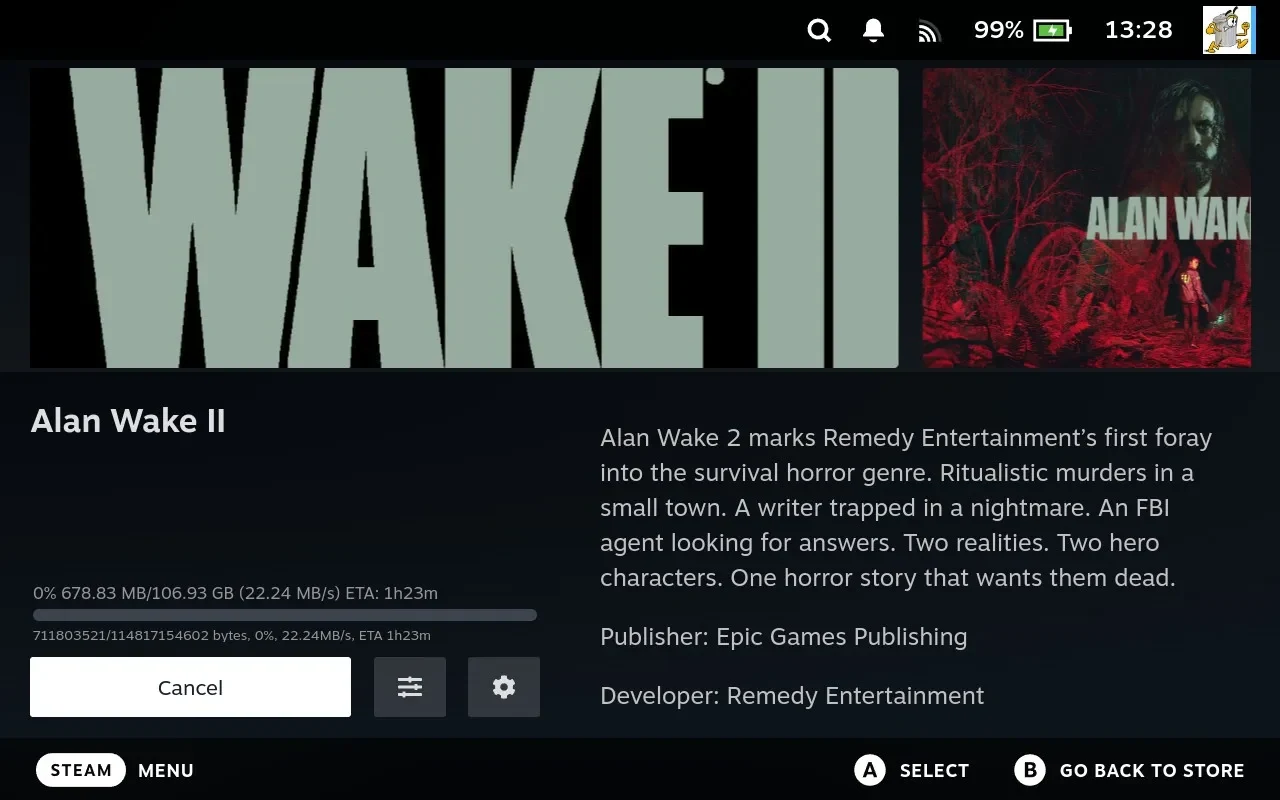
Two failures are worth recognising. Could not connect means the SSH key isn’t in place yet. Could not find game on machine means it answered, but its copy couldn’t be located when it came time to fetch, which usually means it was uninstalled between the search and your pick.
When something’s missing
A game you own isn’t listed. Try Refresh Games List first, and give it time to finish. If that doesn’t help, your session with that store may have expired: see Logging in to a store.
You just claimed a game on the store’s website and it isn’t there. Expected, and a refresh fixes it. See Visiting the store’s website, which also covers why signing in on the website doesn’t sign you in to Junk Store Pro.
A game is listed but won’t install. If you use more than one account with that store, you may be signed in as the one that doesn’t own it. The grid doesn’t separate games by account, so everything shows regardless of who bought it. See More than one account with the same store.
Nothing appears at all. Check you’re signed in to that store, and that the tab isn’t still loading.
The grid is showing the wrong picture. Junk Store Pro uses whichever image is first in the game’s list, so often the right one is already there and just needs moving to the top. See Reordering.
The artwork is wrong or missing. Either fetch alternatives with Search SteamGridDB from the Manage menu, or set an image by hand with the Steam submenu in the File Manager.
A game won’t launch after installing. Its own log is the place to look, and the logs shortcut explains where to find it.