Using the File Manager
On this page
Once the File Manager is open, this is how you drive it: moving around, working with two panes at once, selecting files, and copying, moving or deleting them.
If you haven’t read the four ideas, start there. Nearly everything below assumes them.
Moving around
Navigation is the same whether you use the controller, a keyboard, or the touchscreen.
| You want | Controller | Mouse or keyboard |
|---|---|---|
| Move through the list | D-pad up/down | ↑ / ↓ |
| Unfold a folder where it is | A | Click the twisty |
| Enter a folder, replacing the listing | Start | Double click |
| Go up to the parent | A or Start on .. | Click .. |
| Switch to the other pane | R3, from the sidebar | Tab |
| Open the menu for an item | Left trigger | Right click |
| Show or hide the sidebar | LB | |
| Show or hide hidden files | RB | Ctrl+H |
Unfolding is how you get around here, not entering. Press A on a folder and its contents appear underneath, indented. Press A again to close it. Unfold a few folders and you can see into all of them at once without losing your place, which is why the list looks like a tree.
Entering a folder replaces the whole list with what’s inside it, the way you’d expect from a normal file manager. That’s Start on a controller, or a double click with a mouse. See Start: set the pane’s root.
Try both once and the difference will stick.
With a mouse or the touchscreen, single and double click do different things. This catches people who expect a file manager to behave like the desktop:
| Click | On a folder | On a file |
|---|---|---|
| Single | Focuses it. Nothing opens | Focuses it |
| Double | Enters the folder | Opens the file |
| On the twisty | Unfolds or folds it | |
| Right | Opens the menu | Opens the menu |
A single click on a folder can look like nothing happened. It did focus the folder, so that’s what your next command will act on, but going into it takes a double click, or the twisty to unfold it where it is.
.. is the exception. One click on it takes you straight up a level.
The left trigger opens the menu, and it’s the button that matters most. Copying, extracting, renaming, and every Junk Store Pro job live in there rather than on buttons of their own. If you’re hunting for a feature, that’s where it is. It works on whatever’s focused, and on the sidebar too, where it offers a different set.
Tab is the reliable way to switch panes. There’s a stick-click for it as well, but it only works from the sidebar, so Tab is the one to learn.
Two panes
Turn the second pane on with L3 (press the left stick), or Ctrl+U. You get two independent directory listings, each with its own location and its own history. One is active; that is where your input goes.
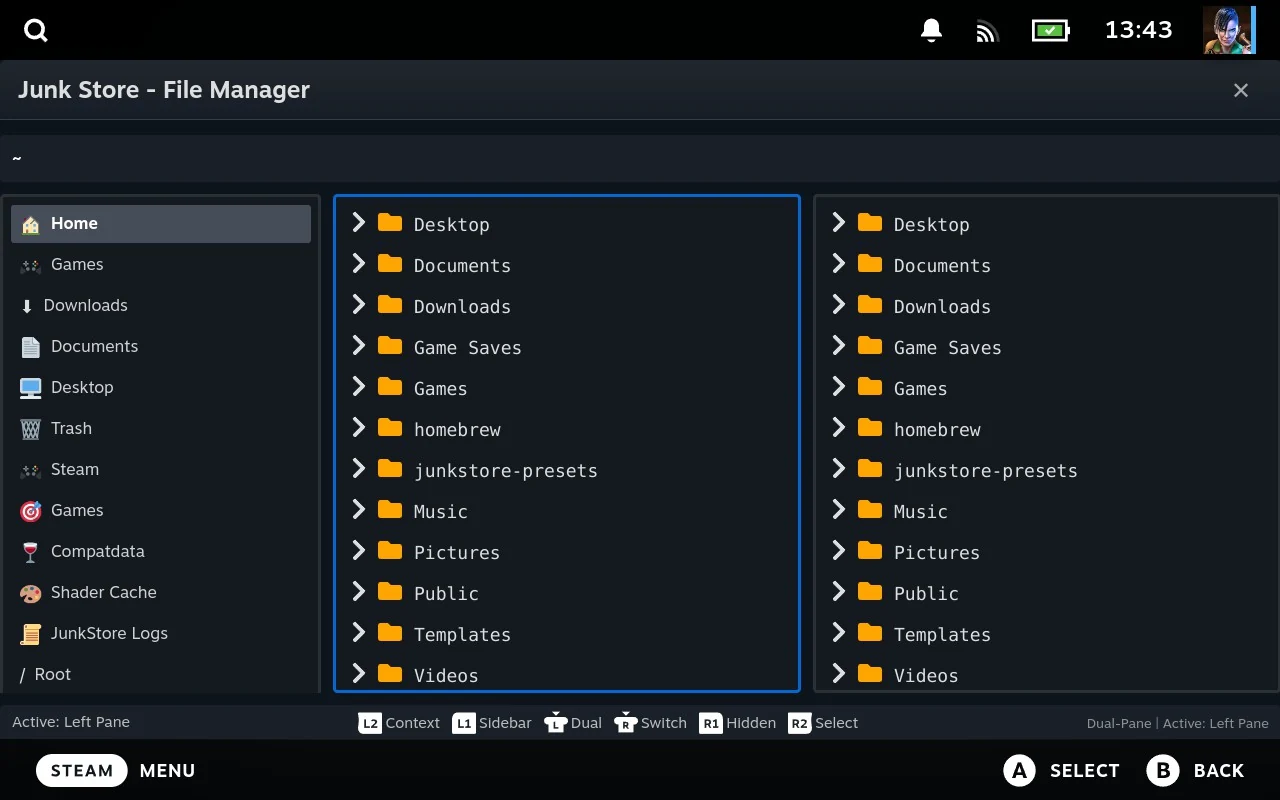
| Job | Controller | Keyboard |
|---|---|---|
| Turn two panes on or off | L3 | Ctrl+U |
| Switch which pane is active | R3, from the sidebar | Tab |
| Copy to the other pane | Left trigger → Copy to … Pane | F5 |
| Move to the other pane | Left trigger → Move to … Pane | F6 |
On a controller the copy and move live in the menu, not on buttons of their own. Focus what you want to move, left trigger, and choose. The entries name the target pane, so there is no ambiguity about direction.
R3 works from the sidebar. From inside a pane it is unreliable, so with a keyboard prefer Tab, and on a controller move focus to the sidebar first if R3 doesn’t respond.
The reason to bother with two panes at all is copying: a source on one side, a destination on the other, no navigating back and forth.
F5 does two different things. With one pane it refreshes the listing. With two panes it copies. This trips people up. Worth knowing before you press it rather than after. Ctrl+R always refreshes, whichever mode you are in.
Sidebar shortcuts navigate the active pane. If you click the game’s install directory and the wrong side changes, the other pane was active.
Selecting several files
Selection is where the File Manager differs most from what you might expect, because it is built for a controller rather than a mouse.
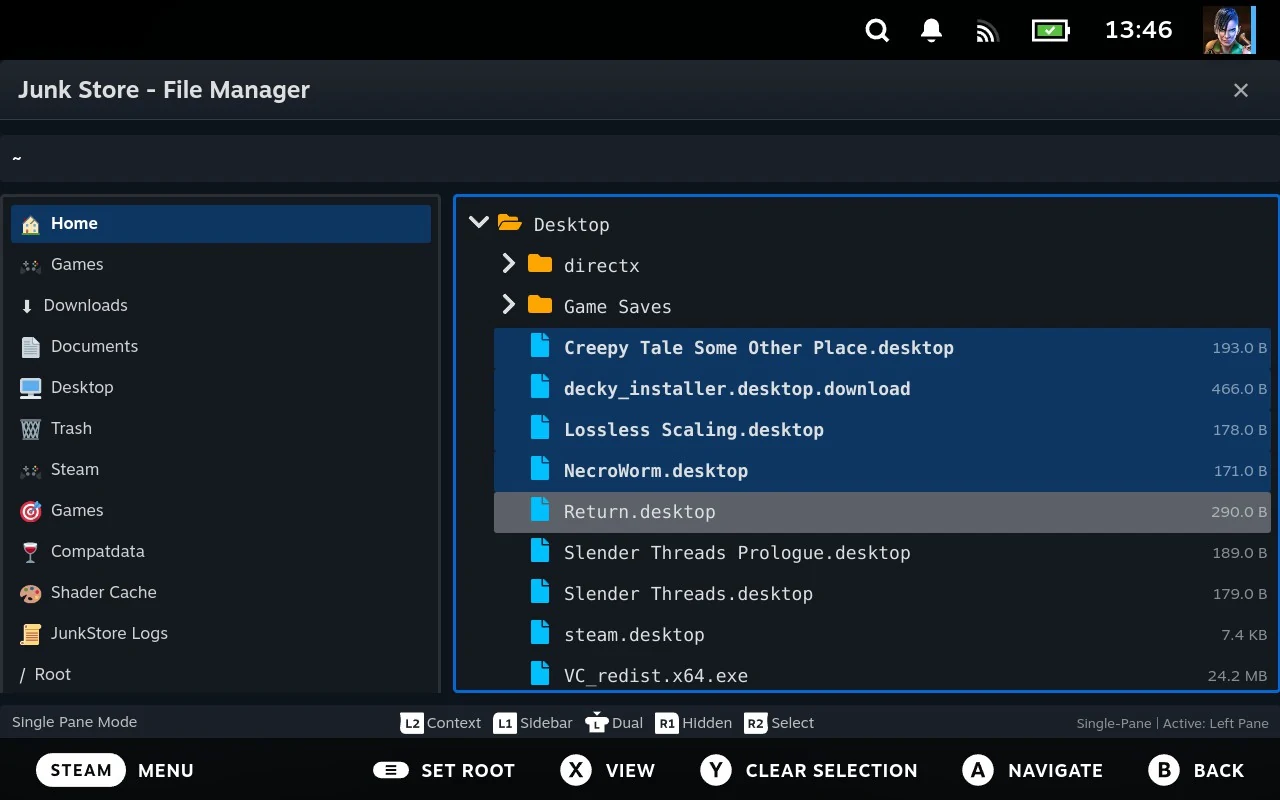
Hold the right trigger and move. Every item you pass over toggles. This is paint-selecting, and it is much faster than picking items one at a time. Because it toggles, dragging back over something you have already selected removes it again.
Y clears the selection and leaves paint mode.
By keyboard:
| Key | Does |
|---|---|
| Ctrl+A | Select everything |
| Ctrl+D | Select nothing |
| Ctrl+I | Invert what is selected |
| Escape | Clear the selection |
Selecting with a mouse
Shift and Ctrl work the way they do everywhere else, with one addition:
| Click | Does |
|---|---|
| Plain click | Selects just that item, clearing anything else |
| Ctrl+click | Adds or removes one item, leaving the rest alone |
| Shift+click | Selects everything between the last item you clicked and this one, replacing the selection |
| Ctrl+Shift+click | Same range, but added to what’s already selected |
| Click empty space | Clears the selection |
That last combination is the useful one people don’t know about. It lets you pick up several separate runs: Shift+click a range, then Ctrl+Shift+click a second range somewhere else, and you have both.
Three things worth knowing, because they explain most surprises:
Ranges count from the last item you plain-clicked or Ctrl+clicked. Shift+click doesn’t move that starting point, so you can Shift+click repeatedly to grow and shrink the same range from a fixed anchor.
Shift+click needs something to count from. If you haven’t clicked anything in this pane yet, it does nothing at all.
A range covers what you can see, not what’s in the folder. If you’ve unfolded folders, their contents are part of the list and get included. Fold them first if you don’t want them.
Ctrl+clicking an item that’s already selected removes it, which is how you drop one item out of a big selection without starting again. On a Mac keyboard, Cmd does what Ctrl does here.
The rule that explains surprising behaviour: commands act on the selection if one exists, otherwise on the focused item. So pressing Delete with nothing selected deletes the item under the cursor. That’s usually what you meant, but it’s worth understanding that a leftover selection somewhere else in the listing takes priority over what your cursor is pointing at.
Copying, moving, and deleting
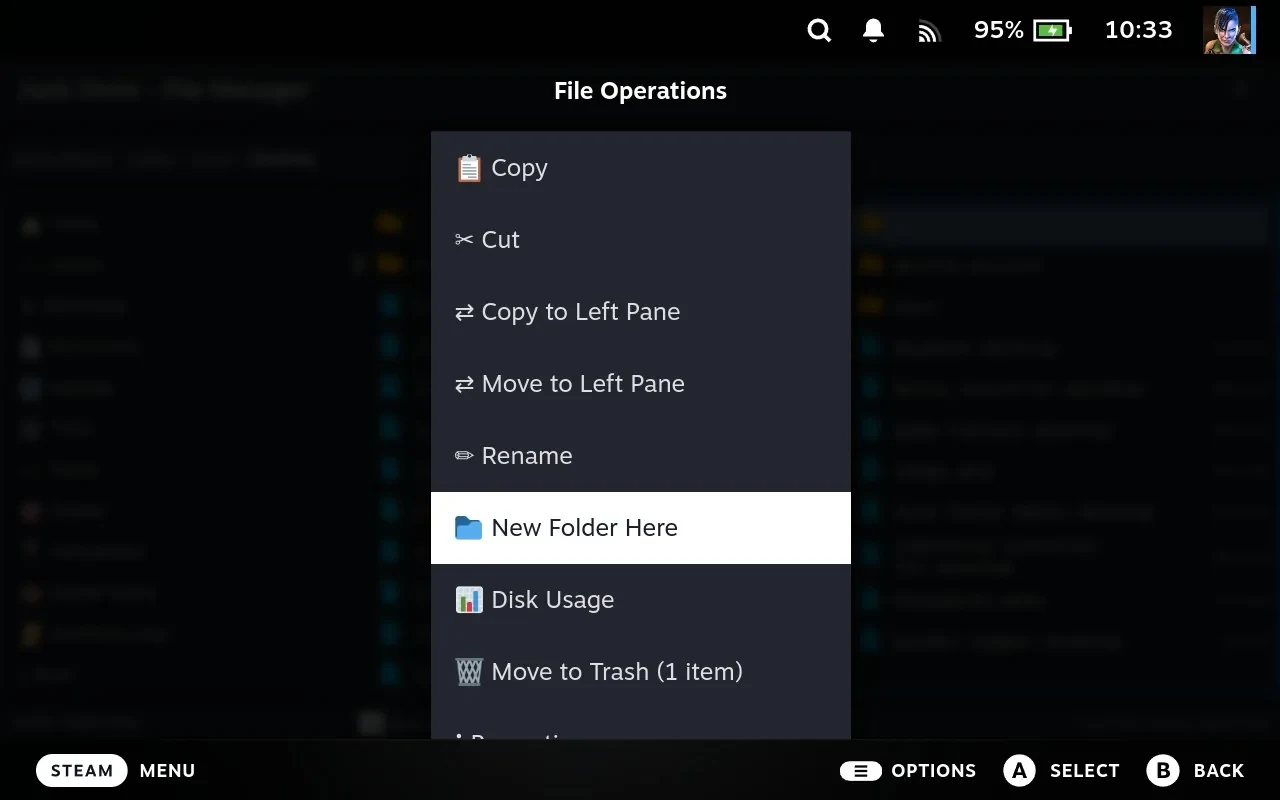
Within a pane, the clipboard works the way it does everywhere:
| Key | Does |
|---|---|
| Ctrl+C | Copy |
| Ctrl+X | Cut |
| Ctrl+V | Paste |
| F2 | Rename |
| Ctrl+Shift+N | New folder |
| Delete | Move to trash |
Delete moves to the trash rather than destroying. Recovering something is a matter of retrieving it from the trash in Desktop Mode.
Where paste actually lands
This one is worth reading twice, because the same keypress puts files in two different places depending on nothing more than what your cursor is sitting on.
| What is focused | Paste lands |
|---|---|
| A directory | Inside that directory |
| A file | In the current directory, beside it |
| Nothing in particular | In the current directory |
| Several items | In the current directory |
The rule underneath: pasting targets the current directory unless exactly one item is focused and that item is a directory, in which case it targets that directory instead.
So highlighting a folder and pasting puts things in the folder, while highlighting a file in that same listing puts them next to it. Both are usually what you meant, which is why it goes unnoticed until it doesn’t.
Two consequences:
- A leftover selection changes the destination. Selecting several items earlier means paste falls back to the current directory even if your cursor is now on a folder. Clear it with Y or Escape if you want the folder.
..doesn’t count. Focusing the parent entry pastes into the directory you are in, not the parent.
If in doubt, put the cursor on empty space or on a file, and paste goes where you are standing.
When a file already exists at the destination you are asked what to do, and nothing is overwritten until you answer.
Long copies show progress and continue while you carry on doing other things.
The File Operations panel
Copies keep running when you close the File Manager, so there is a separate place to watch and cancel them: hold SELECT and press B, or Ctrl+O with a keyboard.
It isn’t part of the File Manager. It is available anywhere in Junk Store Pro, which is the point: start a large copy, close the File Manager, go back to browsing your library, and still be able to check on it. Pressing Ctrl+O again closes it.
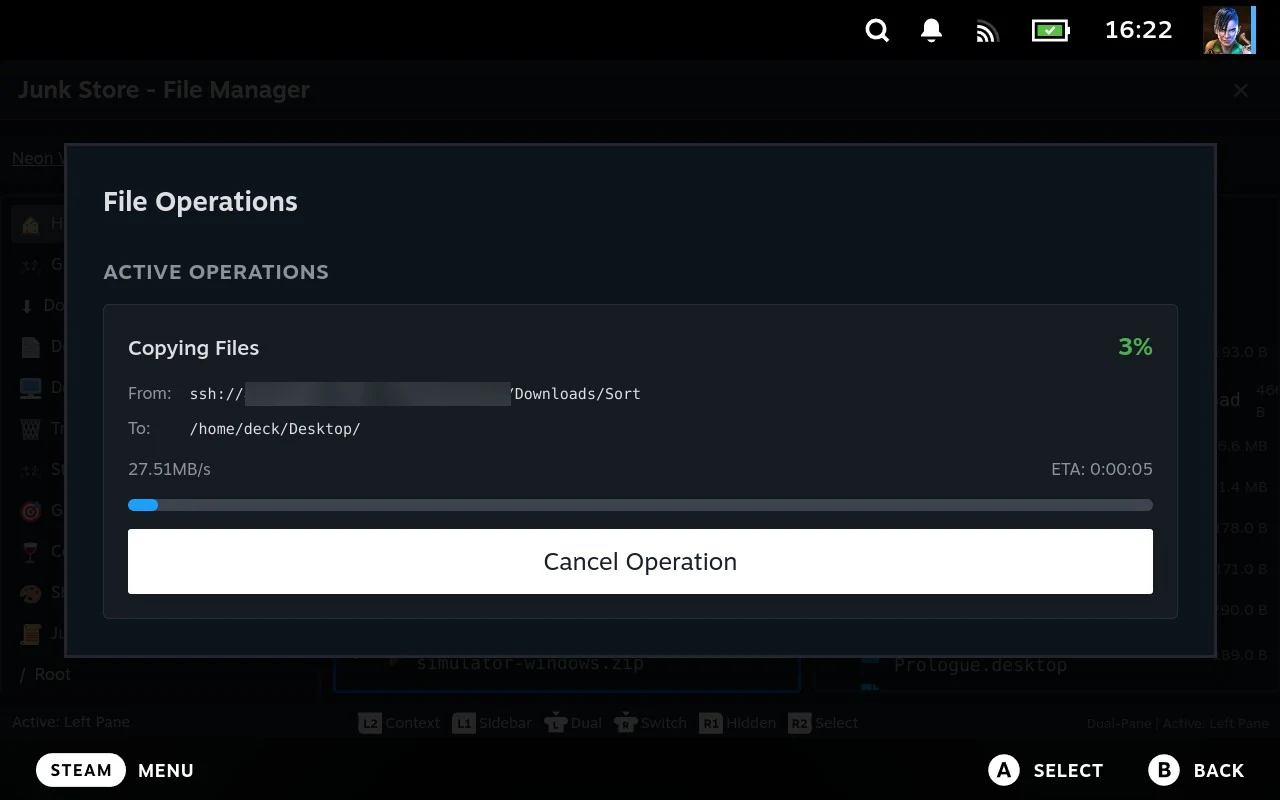
Each running operation shows what it is doing, where from and where to, a progress bar, the current speed, and an estimated time remaining. Cancel Operation stops one without touching the others.
Below that is a short Recent list of things that just finished or were cancelled. Entries disappear a few seconds after completing, so it is a glimpse of what just happened rather than a history. If you need to know whether a copy finished, look while it is still running or check the destination.
Archives
Zip and other archives appear as items you can unfold. Press A on one and its contents appear underneath, indented.
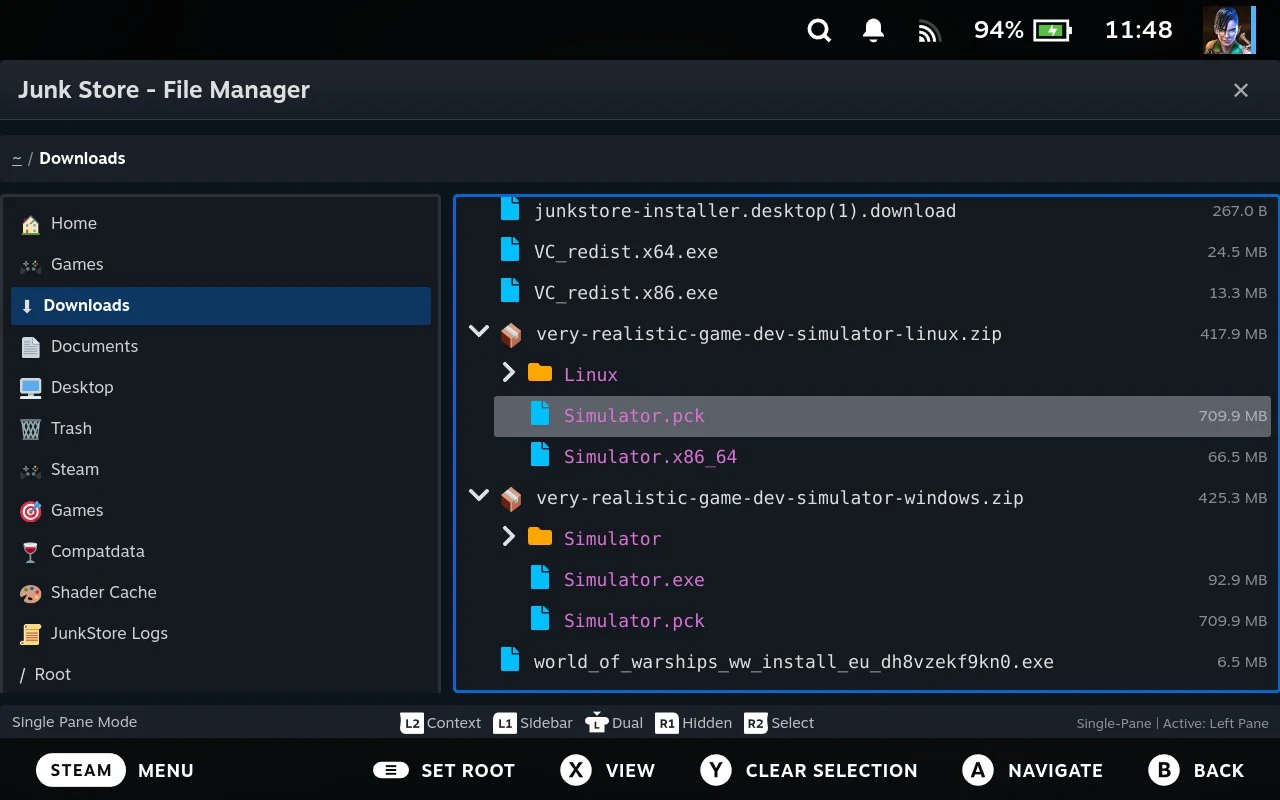
You can’t navigate into an archive, and you can’t paste into one. It unfolds to be read, and that is all. Attempting to paste into an archive tells you it isn’t allowed rather than half working.
To get files out, the item menu offers:
- Extract This File: the one member you have focused
- Extract All: the whole archive, into the current directory
You can also read a file inside an archive without unpacking it: focus the member and press X. See Viewing files.
Related
- Where it comes from and how to open it: The File Manager
- Editing your Steam library, prefixes and DOS games: The File Manager and Steam
- Viewers, disk usage, the sidebar and logs: File Manager tools
- Every shortcut, and what to do when something misbehaves: File Manager reference
- Browsing another computer: Reaching another machine