How to Clear Out Orphaned Non-Steam Game Files on Steam Deck
Find the leftover Proton prefixes and shader cache from games you’ve uninstalled, and get that space back without reformatting
Uninstalling a game doesn't remove its Proton prefix or its shader cache. Test enough games and those leftovers take up a lot of storage. This covers how to find them, check what's inside them, and delete them in Game Mode.
What Uninstalling Leaves Behind
Every Windows game you run gets two folders of its own, both named after the game's numeric ID rather than its name:
~/.steam/steam/steamapps/compatdata/1091500/     <- its Proton prefix
~/.steam/steam/steamapps/shadercache/1091500/    <- its shader cache
The prefix is effectively a small Windows install of its own, and it holds your user data for that game: save files, settings and configs, controller bindings, registry entries, and anything else the game wrote down while you played it. Step 5 comes back to this before you delete anything.
The shader cache is the harmless one. It holds precompiled shaders so the game runs smoothly instead of stuttering while it compiles them, and nothing in it is yours.
Those folders belong to Steam rather than to Junk Store, so when you uninstall the game they stay put. A Deck picks up hundreds of them over a couple of years, and the usual problem is that a folder called 3671418494 tells you nothing about whether it's safe to delete.
The File Manager puts the game's name against each numbered folder, and flags the ones nothing on your Deck claims any more.
Step 1: Check Your Free Space
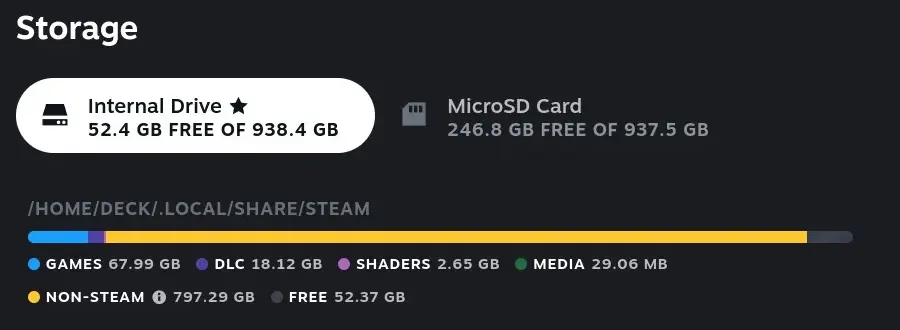
Worth knowing your number before you begin, so you can see what you got back. Go to Steam Settings > Storage and note your free space and your NON-STEAM figure.
Step 2: Open the File Manager
Hold SELECT and press X from anywhere in Steam. It's also on the Junk Store main menu, and Ctrl+B works if you have a keyboard attached. Opening it this way gives you plain file browsing, which is all this job needs. See two ways to open it for what changes when you open it from a game instead.
Press LB to show the sidebar if it isn't already up, then choose Compatdata.
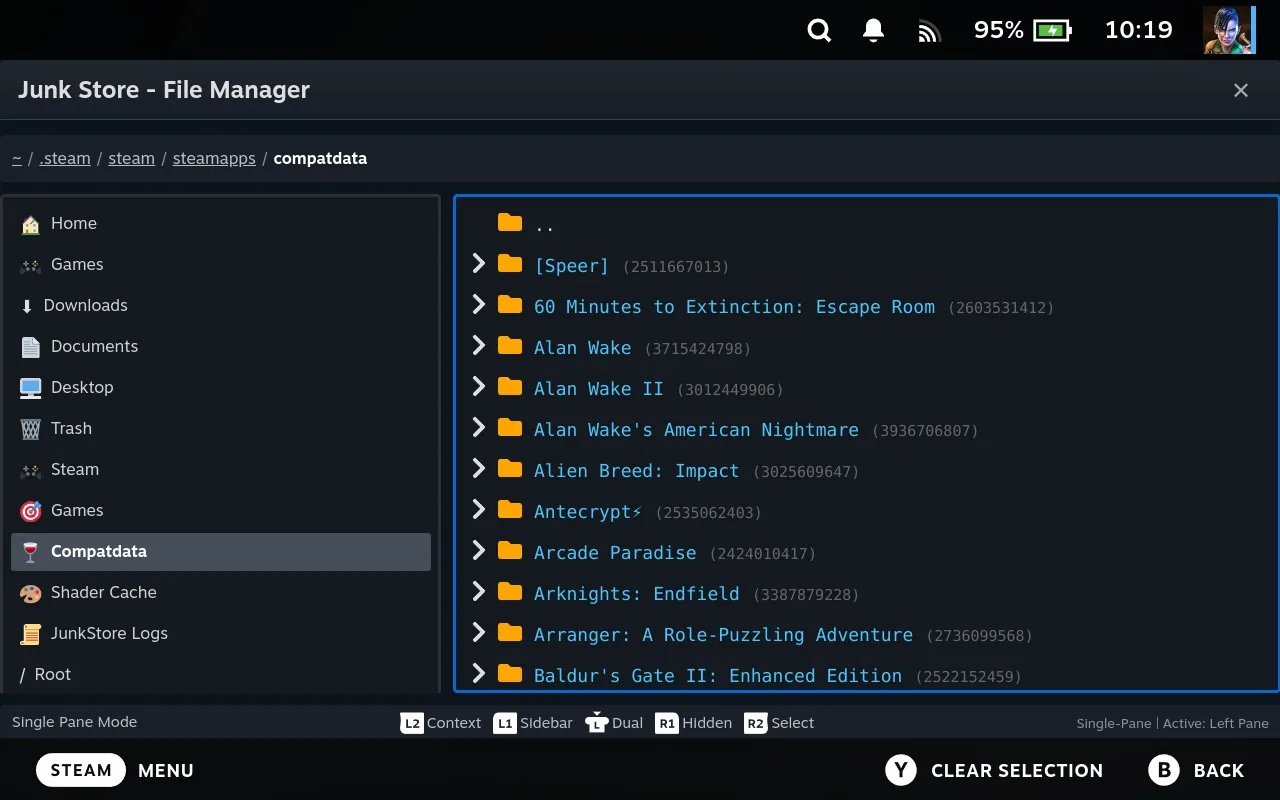
Every folder now shows the game it belongs to, with its ID still in grey next to the name in case you need to match it against something else.
Step 3: Read the Colours
The manual covers this in reading the colours.
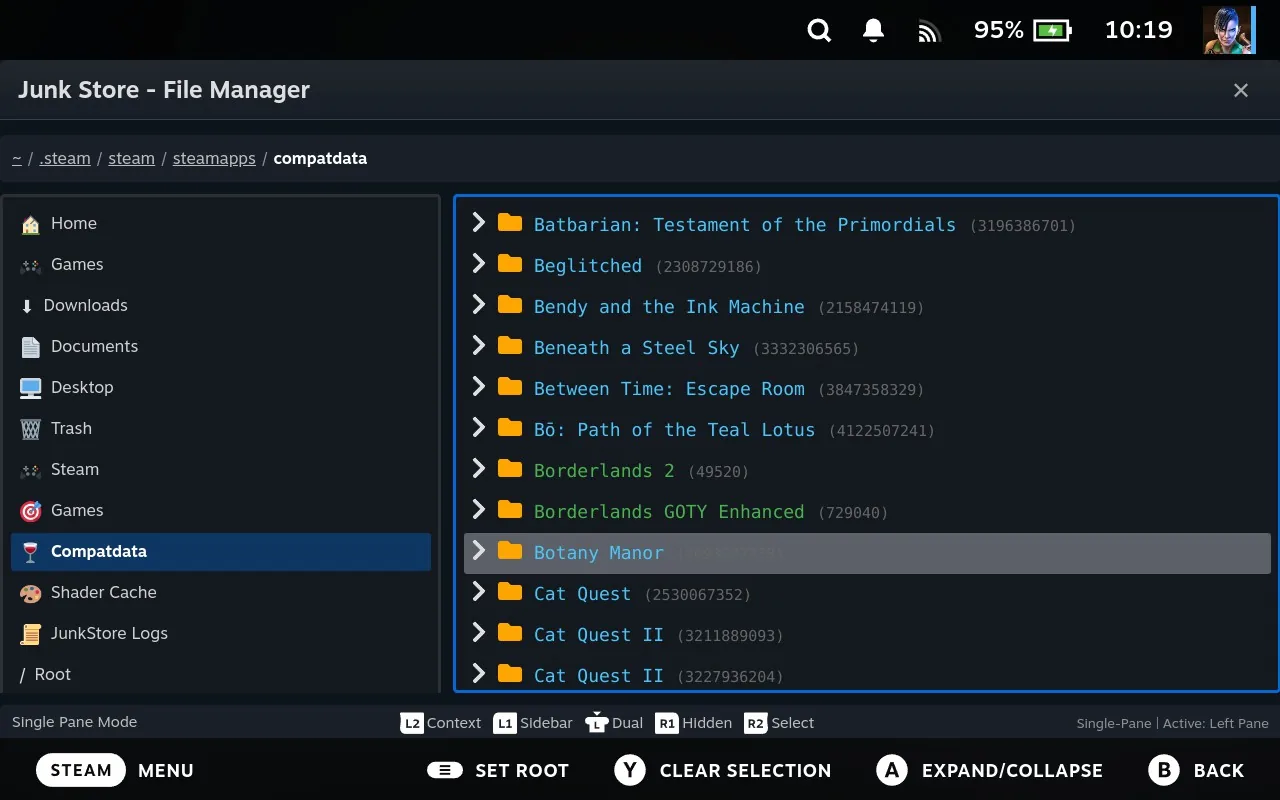
| Colour | What it is |
|---|---|
| Green | A game from your Steam library |
| Blue | A non-Steam game, including anything Junk Store installed |
| Yellow | A runtime rather than a game, such as Proton itself |
| Orange No Game badge | Nothing on this device claims it. This is an orphan |
Step 4: Find the Orphans
Scroll to the bottom of the list. Orphans have no game name to show, so they stay as bare numbers, carry an orange No Game badge, and the whole row is dimmed. They stand out clearly from the named entries above them.
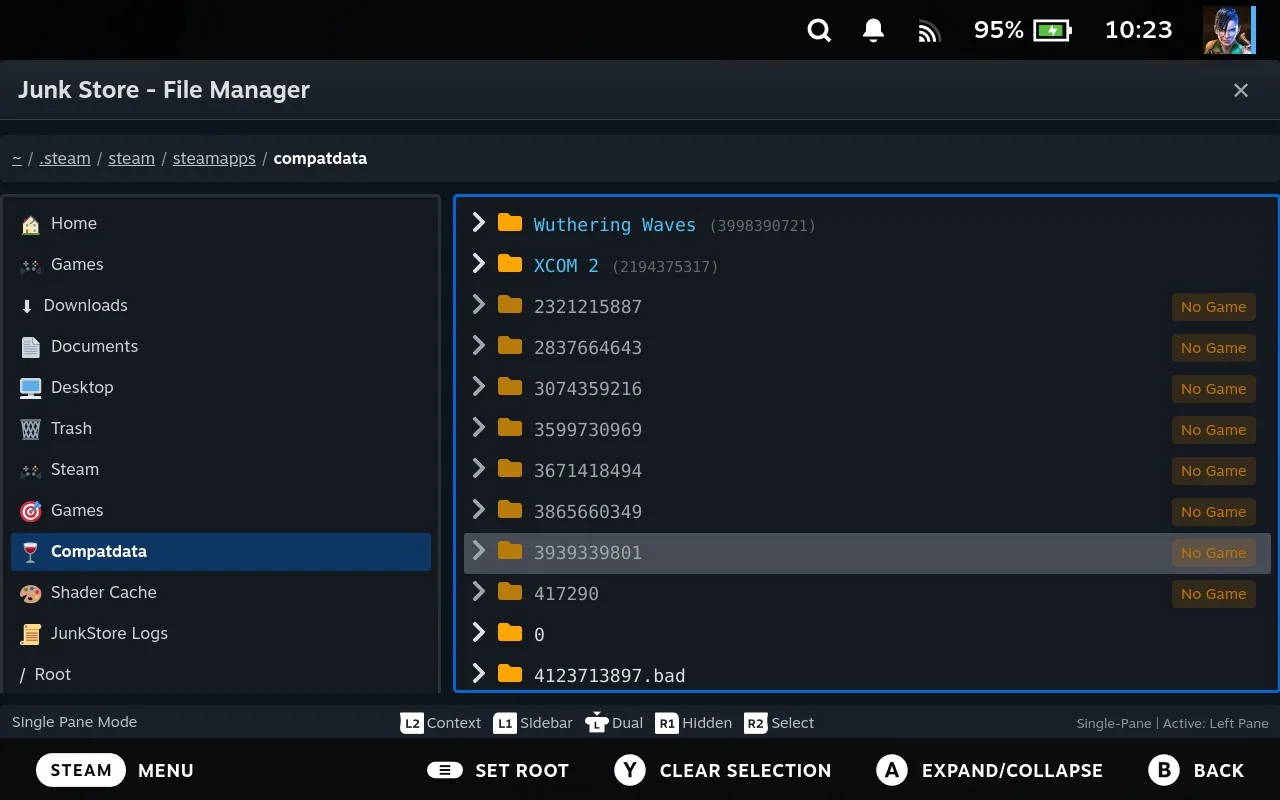
An orphan means the game was uninstalled and its prefix was left behind. Those are the ones you can delete.
Step 5: Check for Saves First
Open the numbered folder and dig down to:
<the numbered folder>/pfx/drive_c/users/steamuser/Documents, Saved Games and AppData below that are the usual suspects. Copy anything worth keeping somewhere else before you carry on. There's more on this in check for saves before you delete a prefix.
drive_c, and copy them back across. Step 6: Move Them to the Trash
- Paint over the orphans
Hold R2 and move down the list. Everything you pass over gets selected, and dragging back over something removes it again. Y clears the lot if you want to start over. The keyboard and mouse equivalents are in selecting several files.
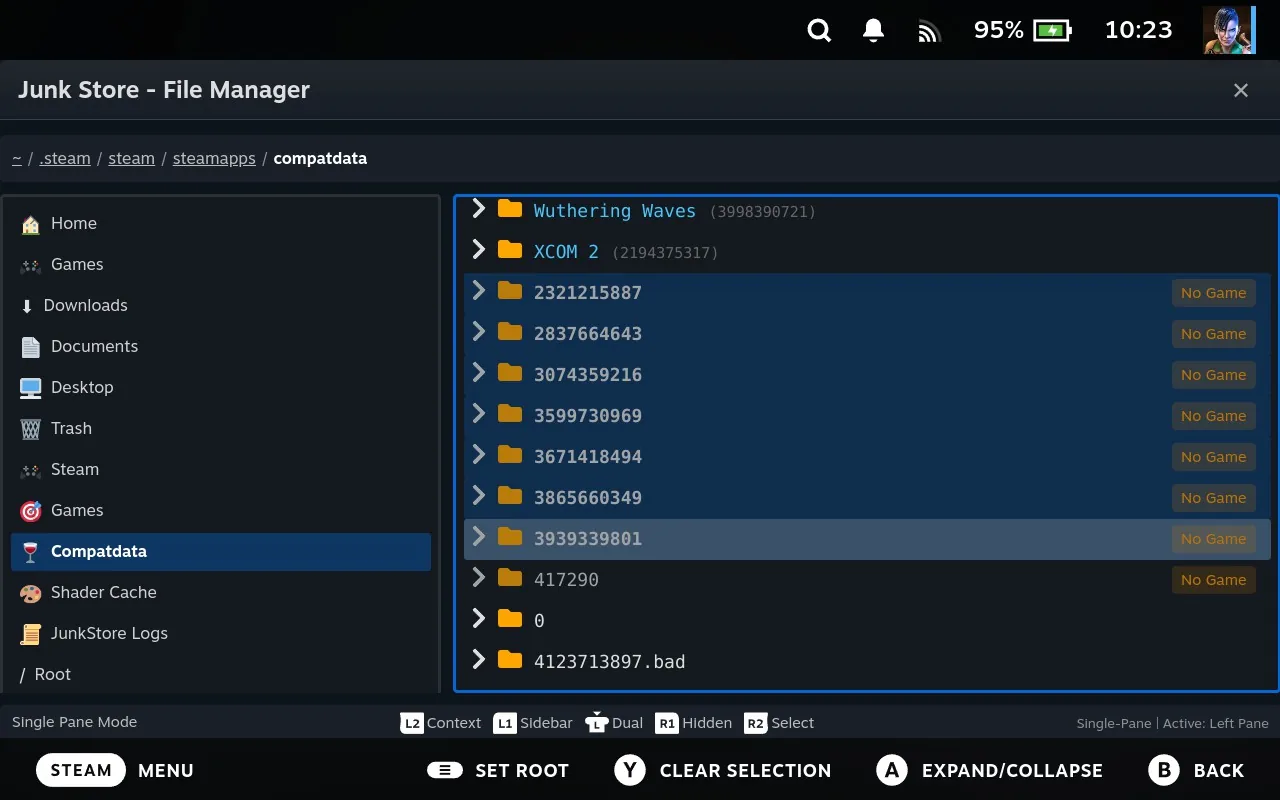
- Open the menu and move them to the trash
Press L2 to open File Operations, or right click if you're on a keyboard and mouse. Choose Move to Trash. It tells you how many items it's about to take, which is a handy last check that you selected what you meant to.
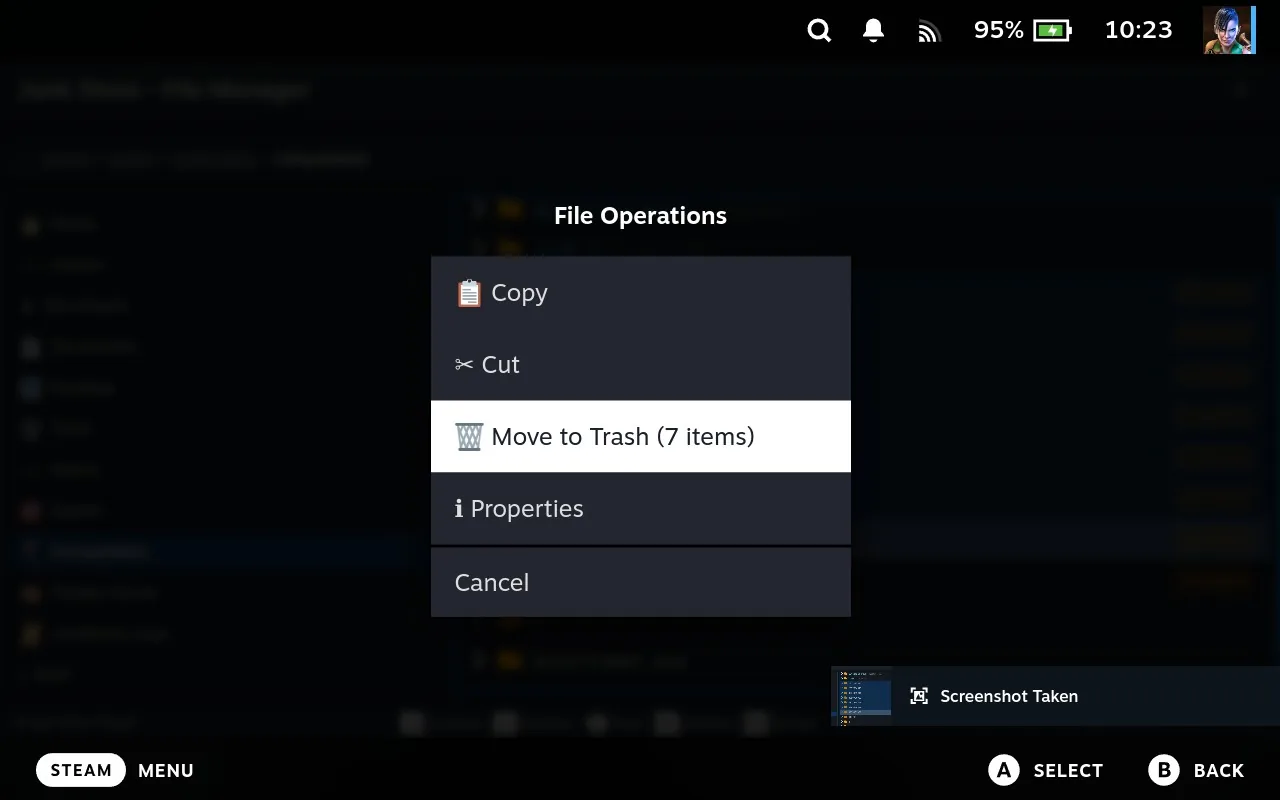
Step 7: Do the Same in Shader Cache
Back to the sidebar, this time Shader Cache. It works the same way as compatdata, with the same colours and names.
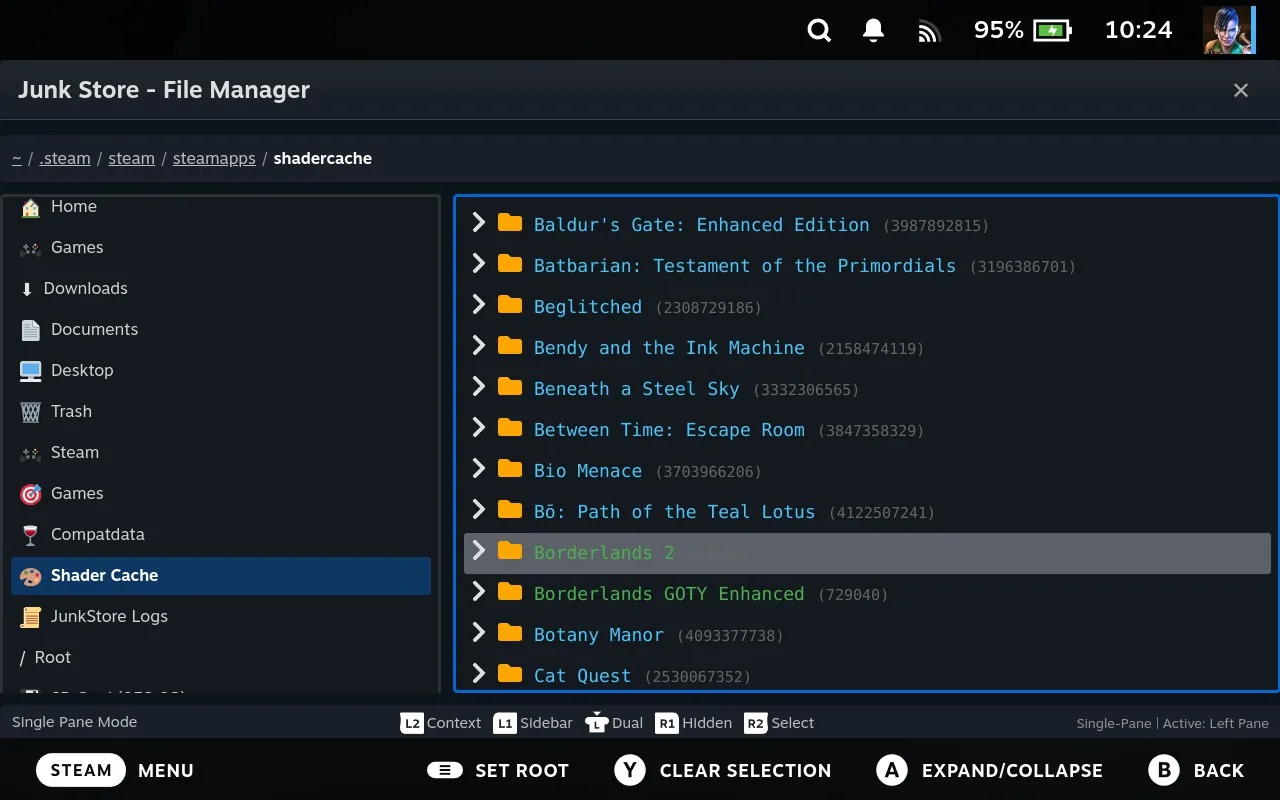
Scroll down and you'll find the orphans in exactly the same place, marked the same way.
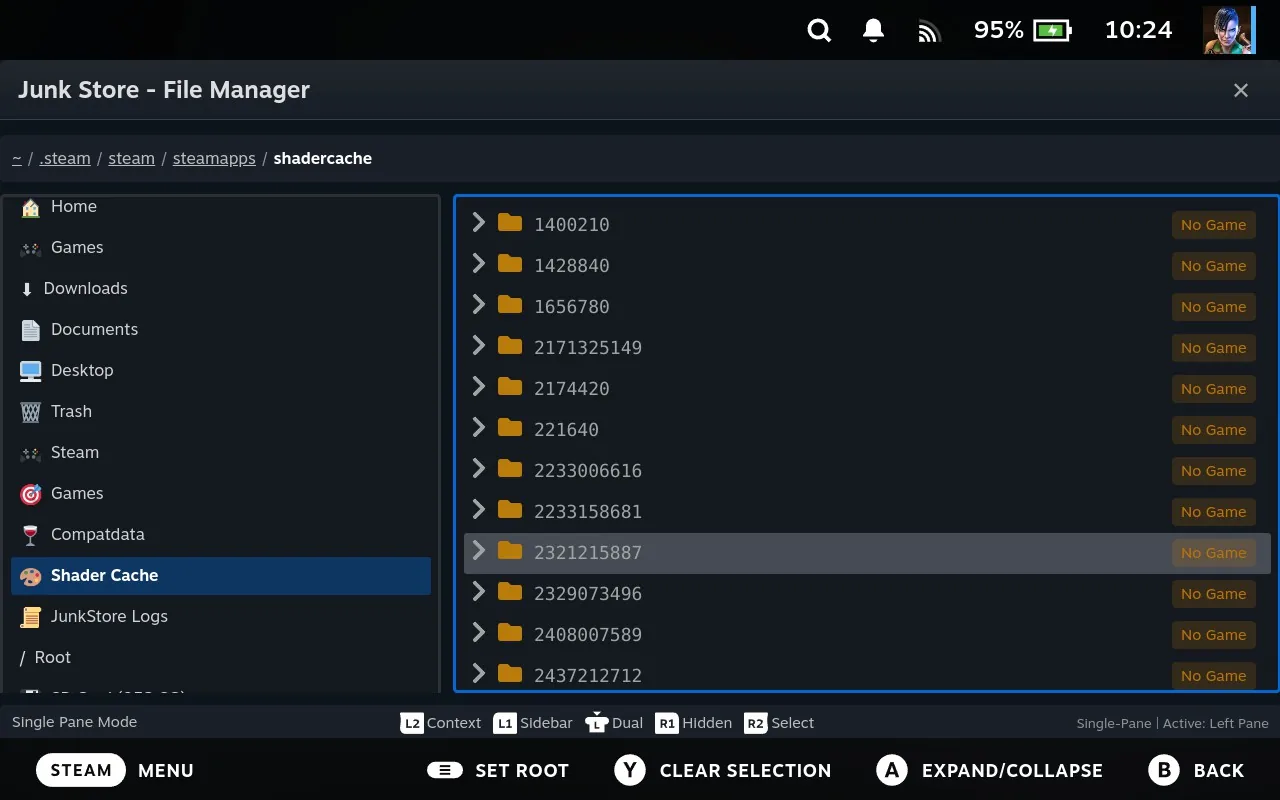
Paint over them with R2 the same way.
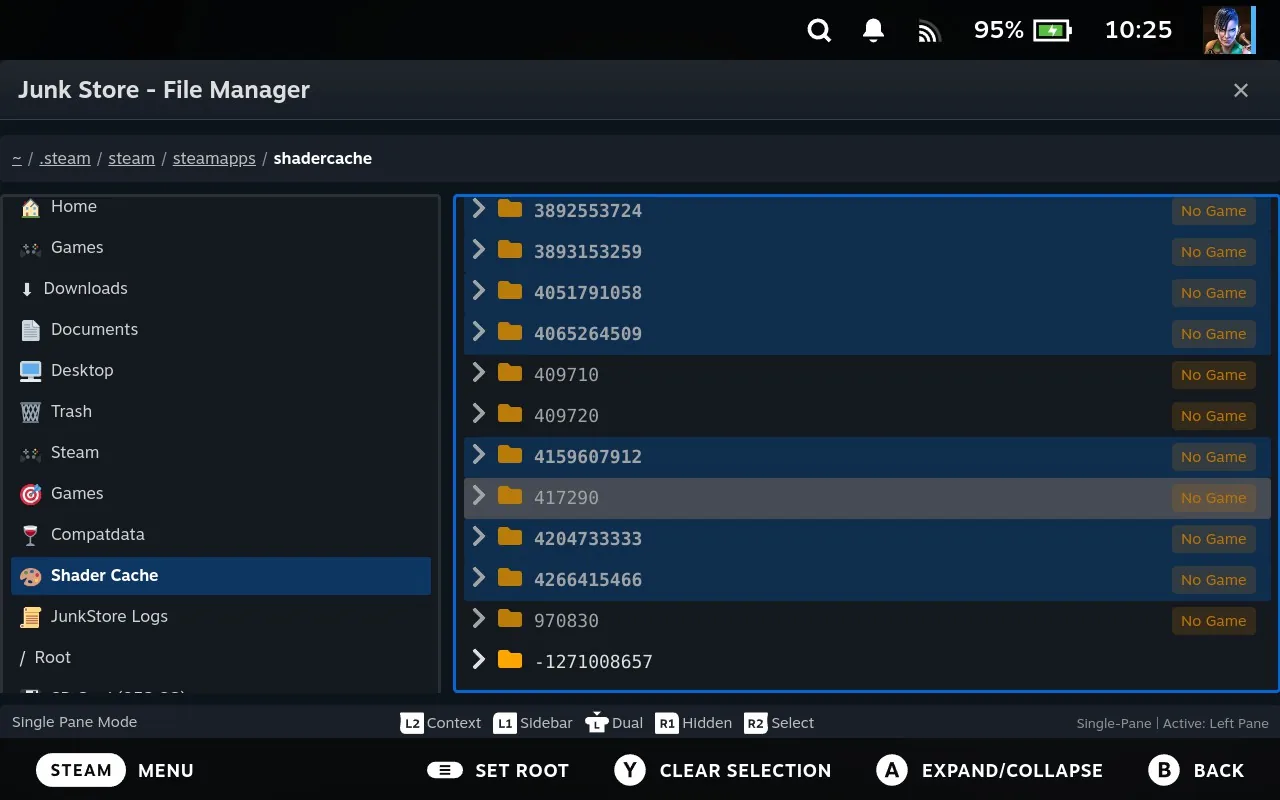
Then L2 and Move to Trash again.
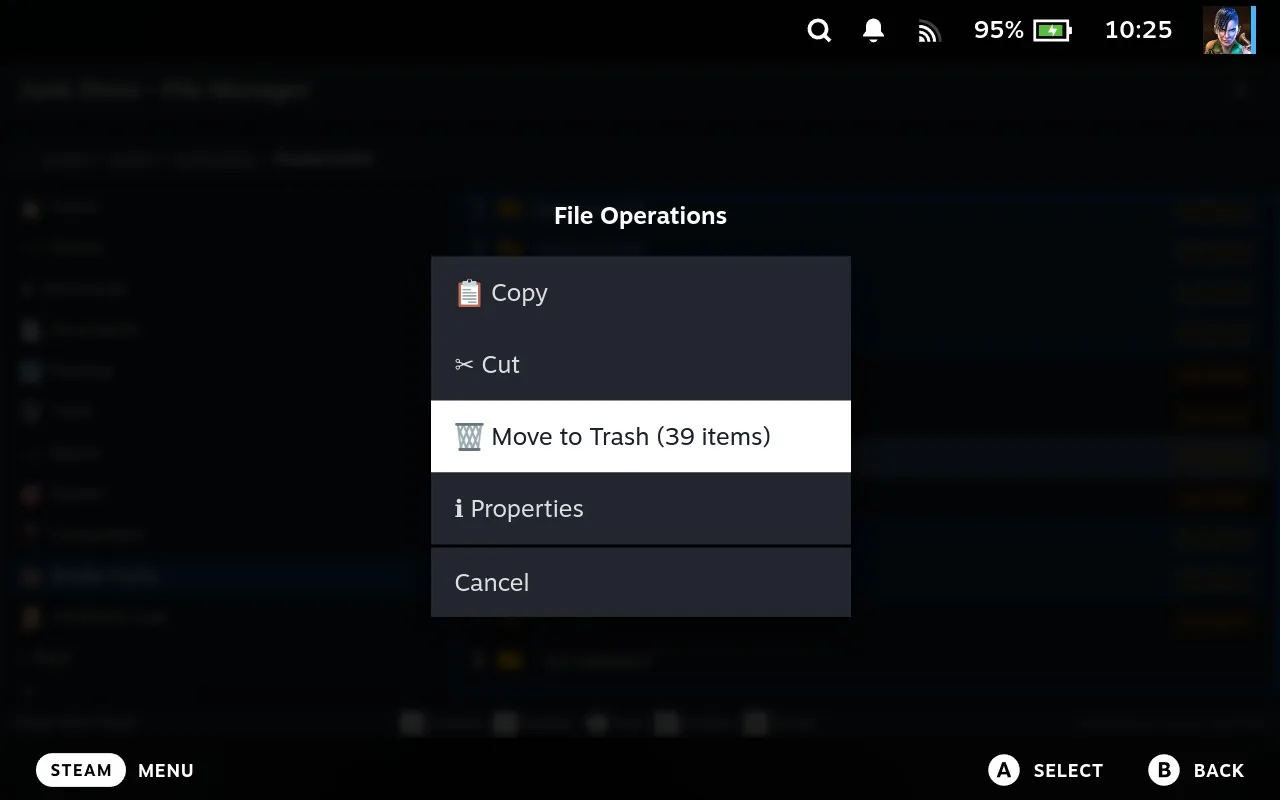
Step 8: Empty the Trash
This is the step people forget, and it's the reason the space doesn't come back. Everything you've deleted so far is still on the drive, taking up every byte it did before.
Have a look in Trash first if you want to be sure of what's in there.
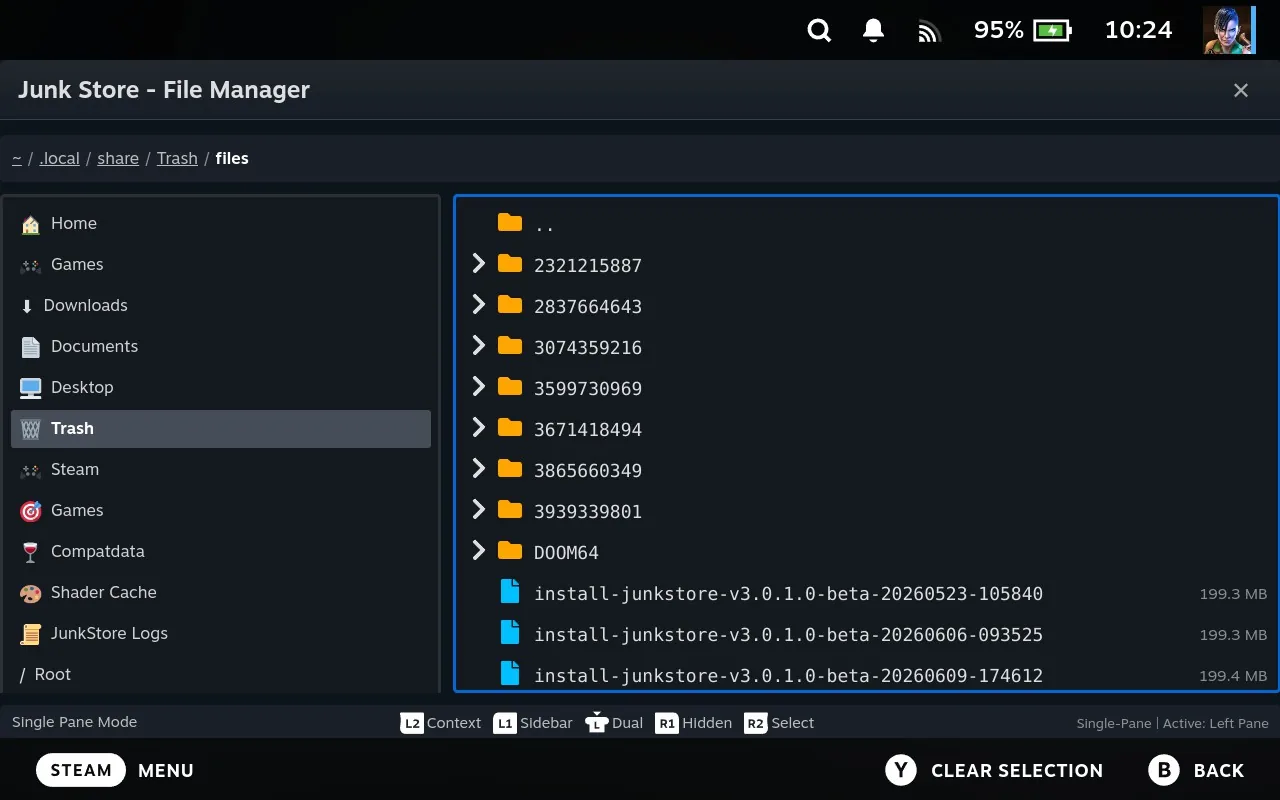
When you're happy, highlight Trash in the sidebar, press L2, and choose Empty Trash.
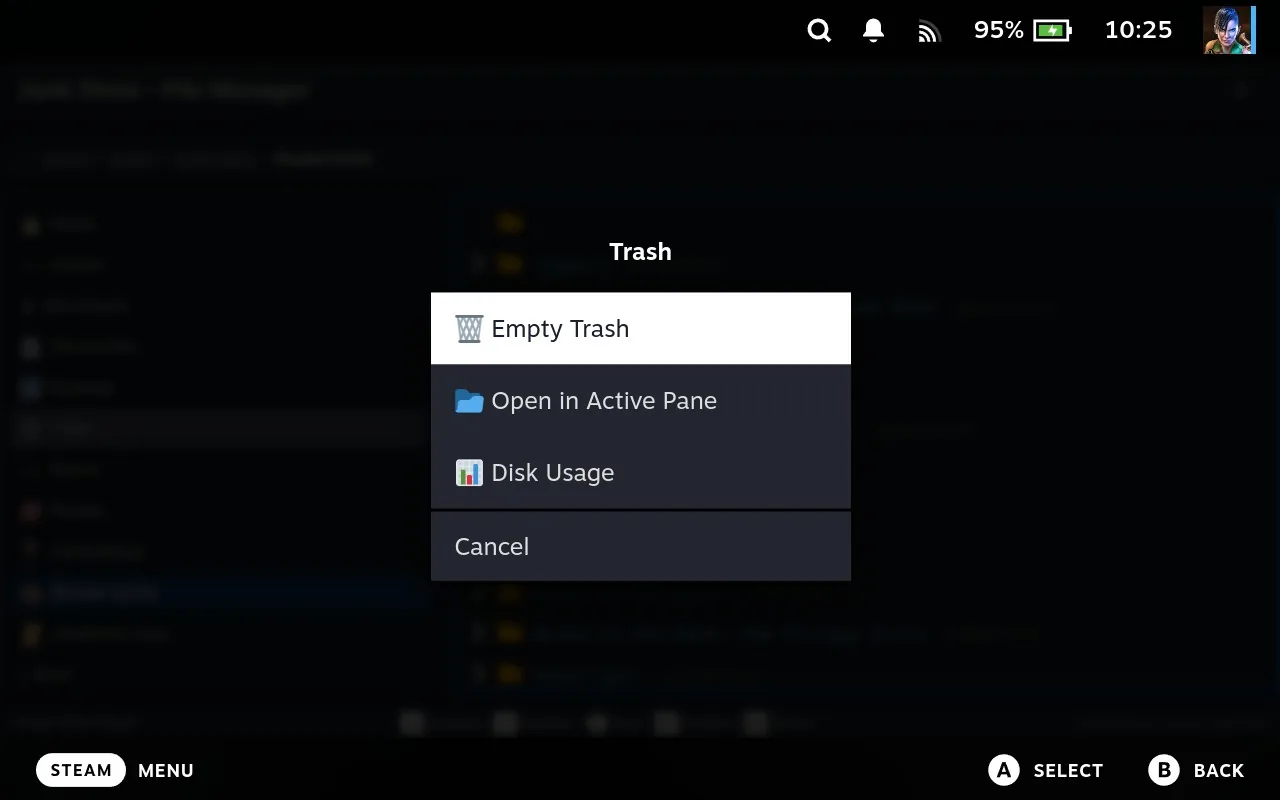
Before and After
On the Deck in these screenshots, clearing the dead prefixes, the orphaned shader cache and a Downloads folder full of old installers took free space from 52.4 GB to 202.1 GB. NON-STEAM dropped from 797.29 GB to 647.55 GB.
Before:
After:
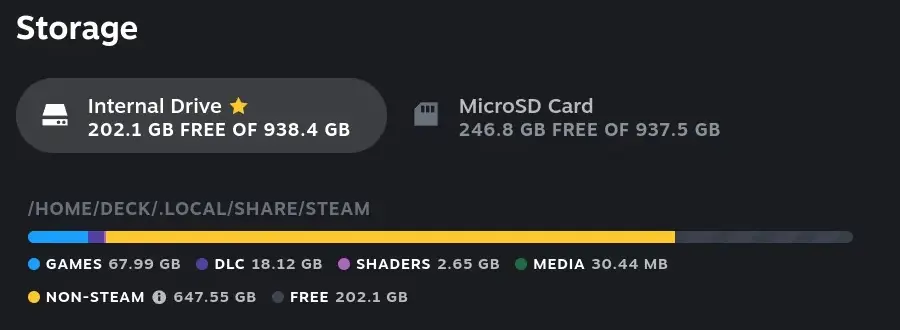
That's about 150 GB back.
Where Else to Look
Leftover prefixes are usually a fair chunk of your NON-STEAM figure, but they won't be all of it. Apps and whatever else you've downloaded over the years add up too.
The sidebar gets you to the spots that quietly fill up:
- Downloads. Installers and setup files tend to collect here long after the thing they installed was set up.
- Screenshots. If you capture a lot, they mount up without you noticing.
- Documents and Desktop. Both are one press away in the sidebar.
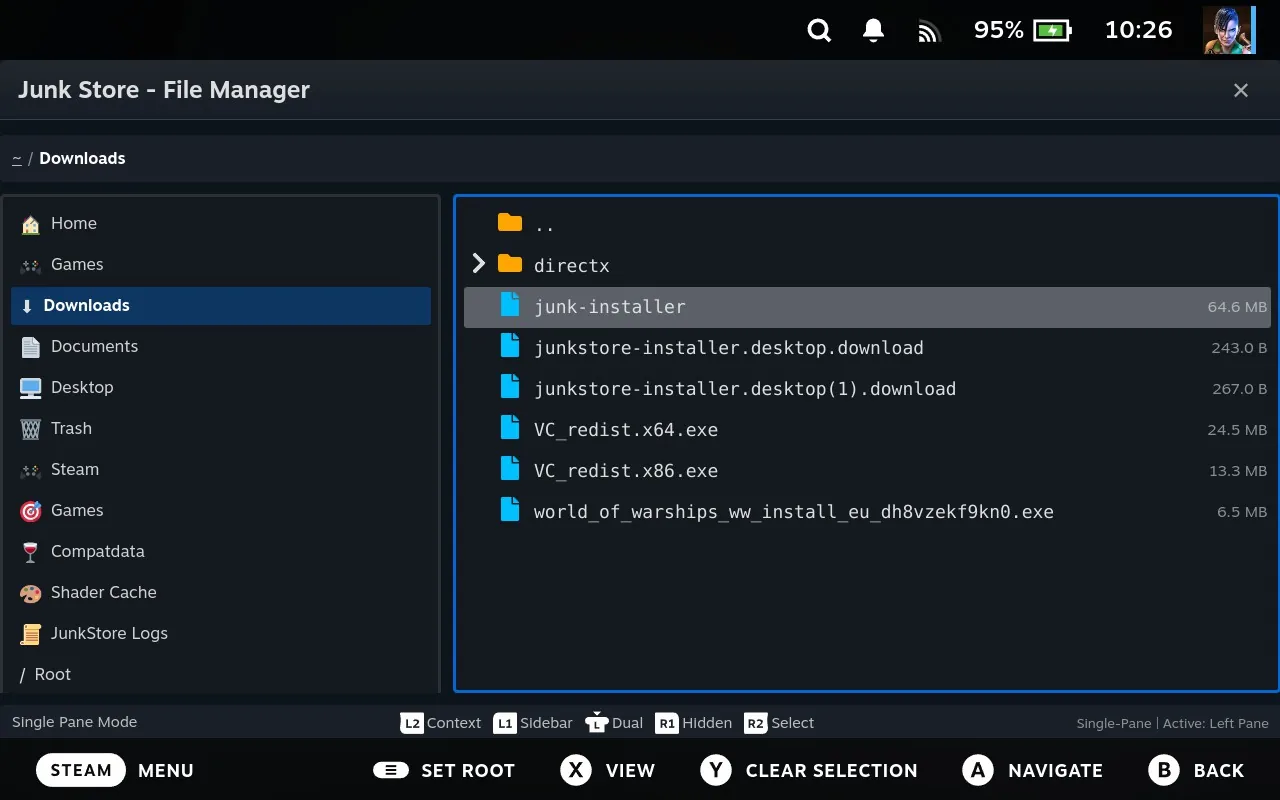
What's worth keeping is your call. Plenty of people hang on to an installer so they can copy it across to another machine later. Have a look at the sizes, decide what you still want, and move the rest to the trash.
For anything outside those folders, use the disk analyser. Highlight any folder, or a sidebar entry like Home, press L2 and choose Disk Usage. You get a treemap: every folder and file drawn as a rectangle sized by how much space it takes, so the biggest thing on screen is the biggest thing on disk.
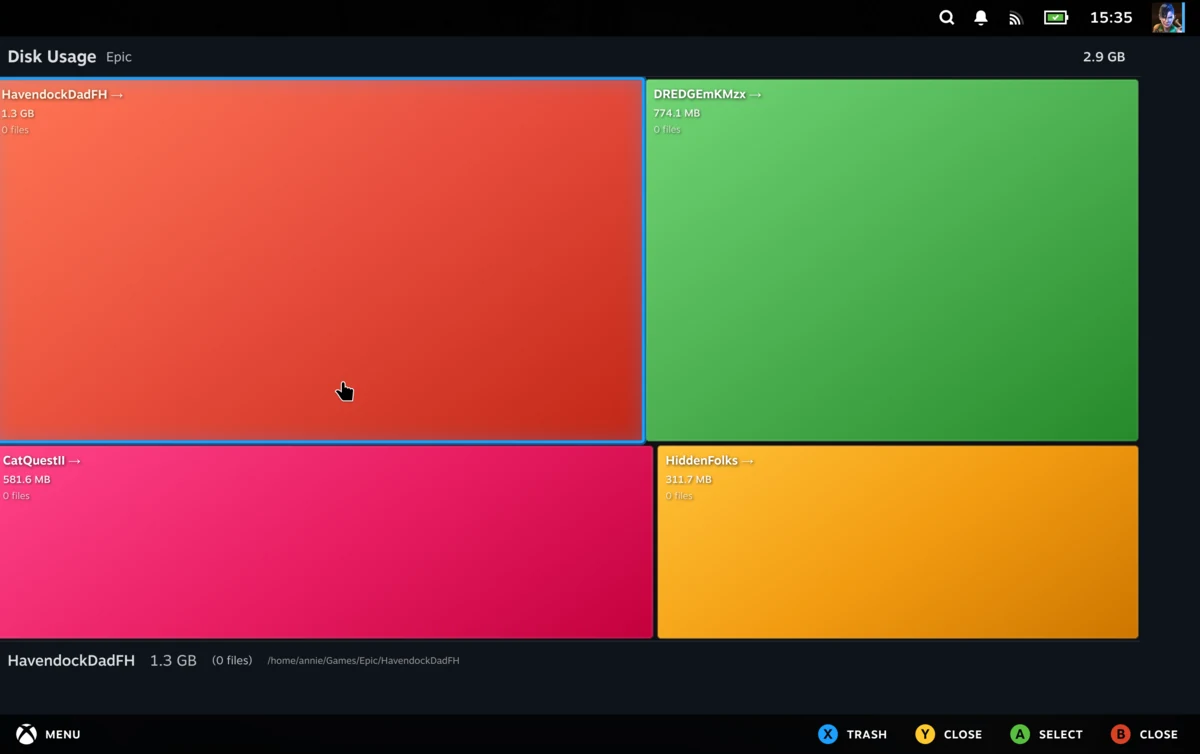
- It fills in as it scans, so a big folder starts showing its shape straight away rather than leaving you at a progress bar.
- Select a rectangle to drill into it. That's how you follow a large area down to whatever is actually responsible, which is usually a few levels below where you started.
- You can bin things from inside the view. Press X to move what you've found to the trash. It confirms first and tells you the size of what's going.
Common finds are games you forgot you installed, video captures, an emulator's ROM library, or a flatpak runtime nothing uses any more.
Cleaning Up a Second Deck
You can do all of this to your other machine from this one. Junk Store Pro finds other Decks on your network and gives each one its own entries in the sidebar, Compatdata and Shader Cache included, with that machine's game names resolved the same way as your own. Deleting works across the connection too, so you can clear the leftovers off both Decks in one sitting.
More in the manual
The Junk Store Pro user manual covers the why behind these screens, if you want the detail rather than the steps.
- Prefixes, shader caches and the numbers problem - Why the folders are numbered, and how the File Manager puts names to them
- Orphans - What the No Game badge means and how orphans come about
- Check for saves before you delete a prefix - Where saves sit inside a prefix, and how to recover them after a reinstall
- Selecting several files - Paint-selecting with the right trigger, and the keyboard equivalents
- Disk Usage - The treemap analyser in full
Stuck or need help?
Most issues are quick to sort out. Here's where to start.
- FAQ - General questions
- Troubleshooting - Common issues
Want the full detail? The user manual covers every screen and setting in Junk Store Pro, and is worth a look if you'd rather read up than hunt through fixes.
Still stuck? Open a support ticket right in the Support Portal
For game-specific issues, feedback, or just a chat, you'll find us on:
On Discord, head to the #js-pro-support channel.